Home>How-to Guides>For Women>How To Properly Fit Bra

For Women
How To Properly Fit Bra
Modified: September 23, 2023
Learn how to properly fit a bra to ensure comfort and support. Our tips and tricks are designed specifically for women, helping you find the perfect fit.
(Many of the links in this article redirect to a specific reviewed product. Your purchase of these products through affiliate links helps to generate commission for Under-tec.com, at no extra cost. Learn more)
Table of Contents
- Introduction
- Why a Properly Fitting Bra is Important
- Step 1: Finding Your Band Size
- Step 2: Determining Your Cup Size
- Step 3: Checking the Fit of the Bra Straps
- Step 4: Evaluating the Center Panel Fit
- Step 5: Assessing the Side Wing Fit
- Step 6: Examining the Underwire Fit
- Step 7: Verifying the Band Fit
- Step 8: Checking the Cup Fit
- Step 9: Moving Comfortably in Your Bra
- Conclusion
Introduction
Finding the right bra can be a challenging and frustrating task for many women. The importance of a properly fitting bra cannot be overstated, as it not only enhances comfort but also contributes to overall breast health and self-confidence. Wearing an ill-fitting bra can lead to discomfort, pain, and even long-term health issues like back and shoulder pain, headaches, and restricted circulation.
The quest for the perfect bra starts with understanding your unique body shape and measurements. Many women are unaware that they may be wearing the wrong bra size, which leads to numerous fit issues. This comprehensive guide will walk you through the steps to properly fit a bra, enabling you to make informed decisions when shopping for lingerie.
Each woman’s body is unique, and the right bra size will vary depending on factors such as breast shape, size, and lifestyle. By following this step-by-step guide, you will gain the knowledge and confidence to determine your correct bra size, ensuring comfort, support, and an enhanced silhouette.
It’s important to note that bra sizes can change over time due to factors such as weight fluctuations, pregnancy, and age. Therefore, it’s recommended to measure yourself periodically and adjust your bra size accordingly to ensure a proper fit.
Let’s embark on this journey together as we delve into the art of finding a bra that not only fits you perfectly but also makes you feel confident, comfortable, and beautiful. So, let’s get started on our quest for the ideal bra!
Why a Properly Fitting Bra is Important
Wearing a properly fitting bra is essential for numerous reasons. Beyond just providing adequate support, a well-fitted bra offers several benefits that contribute to overall comfort, health, and confidence.
Firstly, a properly fitting bra ensures optimal support for the breasts. The right amount of support helps to distribute the weight of the breasts evenly, reducing strain on the back, shoulders, and neck. By providing the necessary support, a well-fitted bra can help alleviate common issues like back pain and discomfort.
Furthermore, wearing a properly fitting bra promotes better breast health. When the breasts are well-supported and positioned correctly, there is less chance of tissue damage or ligament stretching. This is particularly important for women with larger breasts, as insufficient support can lead to long-term effects on breast shape and overall breast health.
In addition to physical benefits, a properly fitting bra can boost your confidence and self-esteem. When you look and feel good in the undergarments you’re wearing, it can positively impact your overall body image. The right bra will enhance your natural shape and provide a flattering silhouette, making you feel more comfortable and confident in your appearance.
Moreover, a well-fitting bra can enhance the drape and fit of your clothing. When your bra fits correctly, it ensures that your clothes hang properly on your body, resulting in a smoother and more polished look. Ill-fitting bras can cause unsightly bulges, visible bra lines, and an overall unflattering appearance under clothing.
Lastly, wearing a properly fitting bra is essential for comfort throughout the day. The right fit ensures that you can move freely without any restrictions or discomfort. It eliminates issues like straps digging into your shoulders, underwires poking you, or the band feeling too tight. When you have a bra that fits properly, you can go about your daily activities with ease and confidence.
In summary, a properly fitting bra is vital for optimal support, breast health, confidence, and comfort. It is an investment in your overall well-being and self-esteem. So, let’s dive into the step-by-step process of finding the right bra size and experiencing the numerous benefits that come with it.
Step 1: Finding Your Band Size
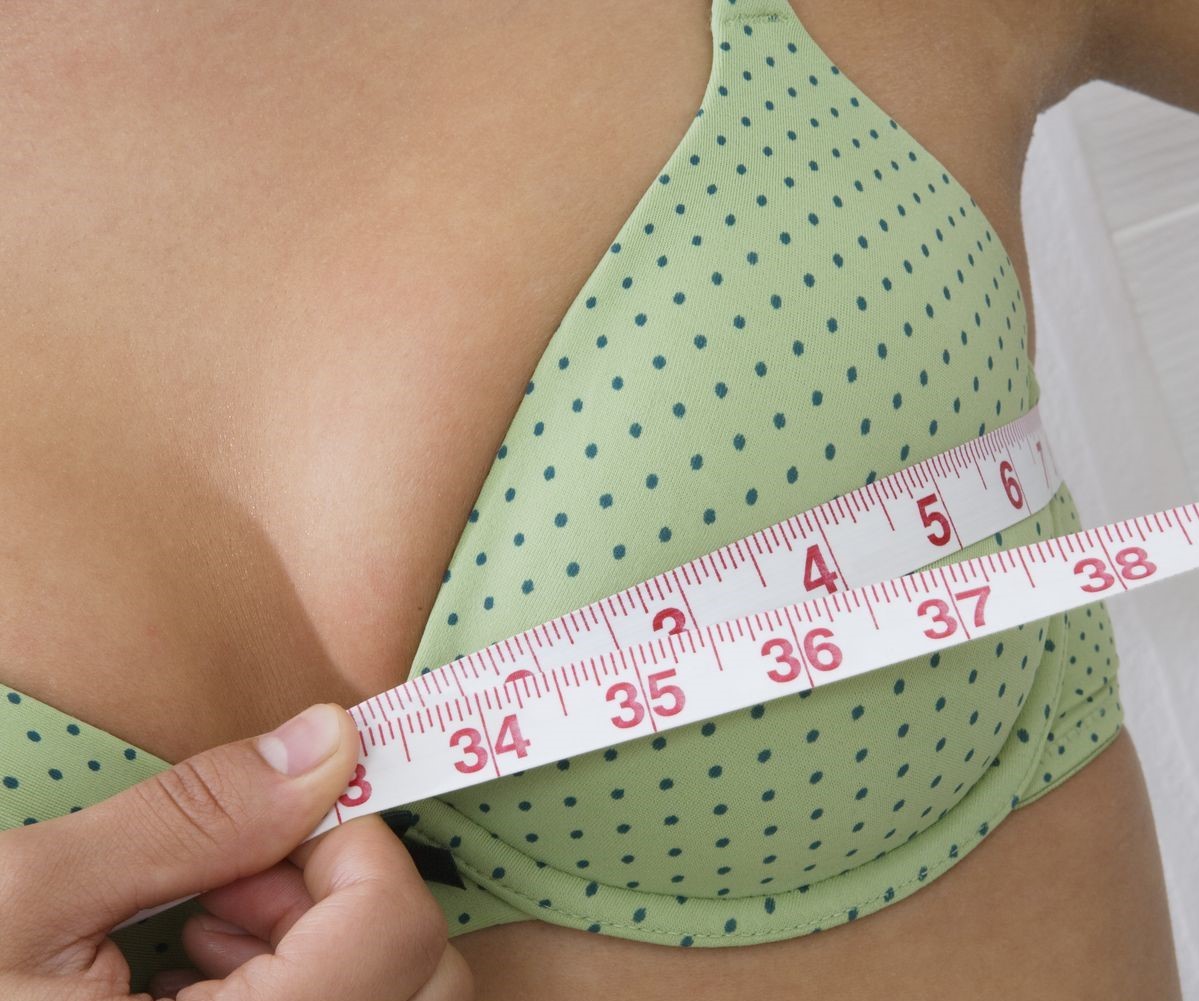
The band size is the measurement of your underbust. It is the foundation of a well-fitting bra and plays a crucial role in providing support. To find your band size, you’ll need a soft measuring tape and to be wearing a non-padded bra or no bra at all.
Start by wrapping the measuring tape around your underbust, just below where the bra band sits. Ensure that the tape is parallel to the floor and snug but not too tight. Take note of the measurement in inches or centimeters.
If the measurement is an even number, that is your band size. For example, if you measure 32 inches, your band size is 32.
If the measurement is an odd number, round up to the next even number to determine your band size. For example, if you measure 33 inches, round up to 34. This ensures a comfortable fit without any unnecessary pressure.
Keep in mind that different brands may have slight variations in sizing. If you fall between two band sizes, it’s a good idea to try on both sizes to determine the best fit for you. Additionally, consider the level of stretchiness of the bra’s fabric, as this can also impact the fit. Opt for a snug, but not overly tight, band that stays in place without riding up or digging into your skin.
By finding your accurate band size, you’ve taken the first step towards achieving a well-fitting bra. Now, let’s move on to determining your cup size in the next step.
Step 2: Determining Your Cup Size
Determining your cup size is just as important as finding your band size for a proper bra fit. Cup size is the measurement of the fullest part of your bust. To accurately measure your cup size, follow these steps:
1. Stand straight with your arms at your sides and breathe naturally. Ensure that the measuring tape is parallel to the floor for accurate results.
2. Wrap the measuring tape around the fullest part of your bust, making sure it goes over the nipples and across your shoulder blades at the back.
3. Note down the measurement in inches or centimeters. This measurement represents your bust size.
4. Subtract your band size (Step 1 measurement) from your bust size. The difference between the two measurements will determine your cup size.
Here is a general guideline to determine your cup size based on the difference:
- If the difference is 0-1 inch, your cup size is AA
- If the difference is 1-2 inches, your cup size is A
- If the difference is 2-3 inches, your cup size is B
- If the difference is 3-4 inches, your cup size is C
- If the difference is 4-5 inches, your cup size is D
- If the difference is 5-6 inches, your cup size is DD or E (varies by brand)
- If the difference is 6-7 inches, your cup size is DDD or F (varies by brand)
- If the difference is 7-8 inches, your cup size is G (varies by brand)
It’s important to note that this is a general guideline, and cup sizes may vary slightly between different brands. It’s recommended to try on bras in a variety of cup sizes to determine the best fit for your unique shape and preferences.
By accurately determining your cup size, you’re one step closer to finding a bra that fits you perfectly. Now let’s move on to the next step, where we’ll learn how to check the fit of the bra straps.
Step 3: Checking the Fit of the Bra Straps
The straps of a bra play a crucial role in providing support and comfort. It’s important to ensure that the bra straps are properly adjusted and fit snugly without digging into your shoulders. Follow these steps to check the fit of the bra straps:
1. Put on the bra and adjust the band to sit comfortably around your torso.
2. Adjust the shoulder straps so they are not too tight or too loose. They should provide support without causing discomfort or leaving marks on your skin.
3. Ensure that the bra straps are lying flat against your shoulder and do not slip off. If the straps are constantly falling off, they may need to be tightened or readjusted.
4. If your bra has adjustable straps, check if they are at the same length on both sides. Uneven straps can cause the bra to fit unevenly and may lead to discomfort or poor support.
5. Move your arms and shoulders to ensure that the straps stay in place and do not dig into your skin. You should be able to move freely without restrictions or discomfort.
If you find that the bra straps are too loose or digging into your shoulders, adjust them accordingly for a better fit. Most bras have adjustable straps that you can loosen or tighten as needed. It’s important to note that as you adjust the straps, the position of the cups may also change, so be sure to check the fit of the cups as well.
Checking the fit of the bra straps is an important step to ensure optimal support and comfort. Well-adjusted straps distribute the weight of your breasts evenly, reducing strain on your shoulders and improving overall comfort throughout the day.
Now that we’ve checked the fit of the straps, let’s move on to the next step, where we’ll examine the fit of the center panel of the bra.
Step 4: Evaluating the Center Panel Fit
The center panel, also known as the gore, is the fabric piece in the center of the bra that sits between the cups against your sternum. It plays a crucial role in determining the fit and support of the bra. Follow these steps to evaluate the fit of the center panel:
1. Put on the bra and ensure that the center panel lies flat against your sternum. It should sit firmly and comfortably without any gaps or digging into your skin.
2. Check if the center panel is positioned between your breasts, with the underwire (if applicable) sitting directly underneath the breast tissue. It should not rest on top of the breast or dig into the breast tissue.
3. Look for any wrinkling or puckering of the fabric in the center panel. If you notice any excess fabric or wrinkling, it could indicate that the bra cup is too big or the style of the bra does not suit your breast shape.
4. Assess the width of the center panel. It should be wide enough to comfortably encompass the space between your breasts. If the center panel is too wide or narrow, it may impact the overall fit and support of the bra.
5. Move your arms and upper body to ensure that the center panel stays in place and does not shift or cause discomfort. You should be able to move freely and comfortably without the center panel digging into your sternum or slipping out of place.
By assessing the fit of the center panel, you can ensure that the bra provides the necessary support and comfort. A well-fitting center panel allows for proper positioning of the cups and underwire (if applicable) and ensures that the bra stays in place throughout the day.
Now that we have evaluated the fit of the center panel, let’s move on to the next step, where we’ll examine the fit of the side wings of the bra.
Step 5: Assessing the Side Wing Fit
The side wings of a bra provide additional support and help anchor the bra in place. They are the fabric panels that extend from the cups towards the bands on the sides of the breasts. Evaluating the fit of the side wings is crucial for comfort and support. Follow these steps to assess the fit of the side wings:
1. Put on the bra and ensure that the side wings lie flat against your ribcage without any gaps or bulges. They should be smooth against your skin and not dig into the sides of your breasts.
2. Check for any spillage or overflowing of breast tissue from the cups towards the sides. This may indicate that the cups are too small or that the style of the bra is not suitable for your breast shape.
3. Assess the height of the side wings. They should be tall enough to fully contain your breast tissue and provide support without causing discomfort. If the side wings are too low, they may not offer adequate support, and if they are too high, they may dig into your underarms.
4. Move your arms and upper body to ensure that the side wings stay in place and do not shift or cause discomfort. They should stay securely against your ribcage without riding up or slipping down.
5. Check the closure of the bra. If the bra has hooks and eyes, ensure that they fasten comfortably without feeling too tight or too loose. The band should feel snug but not constricting, allowing you to breathe comfortably.
By carefully assessing the fit of the side wings, you can ensure that the bra provides the necessary support and a comfortable fit. Well-fitted side wings help to distribute the weight of your breasts evenly and prevent discomfort or pain throughout the day.
Now that we have assessed the fit of the side wings, let’s move on to the next step, where we’ll examine the fit of the underwire (if applicable) in the bra.
Step 6: Examining the Underwire Fit
The underwire, if present in your bra, provides additional support and helps shape the breasts. It is important to examine the fit of the underwire to ensure optimal comfort. Follow these steps to examine the underwire fit:
1. Put on the bra and ensure that the underwire follows the natural curve of your breasts, sitting flush against your ribcage underneath the breast tissue. It should encase the entire breast without digging into the breast or resting on top of it.
2. Check that the underwire sits flat against your ribcage from the center panel to the sides. There should be no gaps or spaces between the underwire and your skin. If you notice any lifting or floating of the underwire, it may indicate that the cup size is too small or that the shape of the bra does not suit your breast shape.
3. Ensure that the underwire does not poke or dig into your breast tissue, causing discomfort or pain. If you experience any discomfort, you may need to adjust the positioning of the underwire or try a different bra style.
4. Move your arms and upper body to ensure that the underwire stays in place and does not shift or cause discomfort. It should remain securely against your ribcage without poking or shifting throughout the day.
5. If you prefer non-underwire bras, ensure that the bra provides sufficient support and shaping without the use of underwire. Look for features like molded cups, additional lining, or a supportive band to meet your comfort and style preferences.
By examining the fit of the underwire, you can ensure that the bra provides both support and comfort. A well-fitting underwire distributes the weight of your breasts and helps to shape them without causing discomfort or pain.
Now that we have examined the underwire fit (if applicable), let’s move on to the next step, where we’ll focus on verifying the fit of the band.
Step 7: Verifying the Band Fit
The band of a bra provides the majority of the support, so it’s essential to verify its fit. Follow these steps to ensure the band is the correct size for optimal comfort and support:
1. Put on the bra and fasten it on the loosest hook. The band should feel snug but not overly tight. It should sit horizontally around your torso, parallel to the floor, without riding up or digging into your skin.
2. Check that you can comfortably insert two fingers underneath the band. This indicates that the band is not too tight. If you can fit more than two fingers or the band is loose and easily pulled away from your body, you may need to adjust to a smaller band size.
3. Assess the stability of the band by moving your arms and upper body. The band should stay in place without shifting or riding up. It should provide support and stay securely anchored throughout the day.
4. Check for any bulging or visible lines where the band sits. If the band is digging into your skin, it may be too tight, and you may need to consider a larger band size or a bra style with a more forgiving band.
5. If the bra has adjustable straps, ensure that the band does not lift or sag when the straps are adjusted. The majority of the support should come from the band, so it should not rely solely on the straps for lift and support.
Verifying the fit of the band is crucial for providing the necessary support for your breasts and ensuring overall comfort. The band should feel secure, yet comfortable, providing a solid foundation for the rest of the bra to do its job effectively.
Now that we have verified the band fit, let’s move on to the next step, where we’ll focus on checking the fit of the cups.
Step 8: Checking the Cup Fit
Checking the fit of the cups is crucial to ensure that your breasts are properly supported and shaped. Here’s how you can check the fit of the cups:
1. Put on the bra and adjust the straps and band to ensure a comfortable fit.
2. Make sure that your breasts are fully enclosed within the cups with no spillage or bulging. The cups should gently embrace your breasts without causing any discomfort or compression.
3. Assess the shape of the cups. They should smoothly contour to the shape of your breasts without any wrinkling or puckering. If you notice any excess fabric or wrinkling, it could indicate that the cup size is too big or the style of the bra is not suitable for your breast shape.
4. Move your arms and upper body to ensure that the cups stay in place and provide support without shifting or digging into your breast tissue. The cups should stay securely against your breasts, maintaining their shape and support.
5. If your breasts have different sizes or shapes, ensure that both breasts are adequately supported and shaped within the cups. Consider bras with adjustable straps or styles that allow for individual adjustment of each cup to ensure a better fit.
Checking the fit of the cups is vital for achieving proper support, shaping, and comfort. Well-fitting cups enhance your natural silhouette and contribute to overall breast health and confidence.
Now that we have checked the cup fit, let’s move on to the final step, where we’ll focus on moving comfortably in your bra.
Step 9: Moving Comfortably in Your Bra
Once you have ensured the proper fit of your bra, it’s important to assess how comfortable it is when you’re moving. Here are some steps to help you determine if your bra allows for comfortable movement throughout your day:
1. Perform various movements like raising your arms, bending over, and twisting from side to side. Observe if the bra stays in place and provides support without causing any discomfort or restrictions.
2. Check if the bra straps stay securely in place and do not dig into your shoulders or slide off. They should allow for free and comfortable movement of your arms without causing any irritation.
3. Move your upper body in different directions to ensure that the band stays in place and does not ride up or shift. The band should remain horizontal and provide stable support during all your activities.
4. Jump gently in place or perform some light exercises to check if the bra provides adequate support and minimizes excessive bounce. This is particularly important for high-impact activities or for women with larger breasts who require extra support.
5. Pay attention to any discomfort, pinching, or rubbing sensations while moving. If you experience any discomfort, it may indicate that the bra is not the right fit for your body shape or that the style does not suit your lifestyle and activities.
It’s crucial to remember that comfort is subjective, and what works for one person may not work for another. Take the time to test the comfort and fit of your bra in various situations to ensure it meets your unique needs.
By focusing on how comfortably you can move in your bra, you can ensure that it enhances your daily activities without causing any discomfort or hindrance.
Congratulations! You have completed all the steps to properly fit your bra. By following this guide, you have empowered yourself to make informed decisions when shopping for bras, ensuring comfort, support, and confidence in your lingerie choices.
Conclusion
Finding the perfect fitting bra is a journey that every woman should embark on. A properly fitting bra not only enhances comfort but also promotes breast health and boosts confidence. By following the steps outlined in this guide, you can ensure that you are wearing a bra that provides the optimal support, shaping, and comfort for your unique body.
Remember, finding the right bra size is just the beginning. It’s essential to periodically assess your measurements and check the fit of your bras as factors like weight fluctuations, pregnancy, and aging can impact your bra size. Adjustments may be necessary to ensure continued comfort and support.
Throughout this guide, we have learned how to measure and determine your band and cup sizes, check the fit of the straps, evaluate the fit of the center panel and side wings, examine the fit of the underwire (if applicable), verify the fit of the band, assess the fit of the cups, and ensure comfortable movement in your bra.
Now armed with this knowledge, you can confidently walk into any lingerie store or shop online with the certainty of finding a bra that fits you perfectly. Remember, comfort is key, and every woman deserves to feel comfortable and supported throughout the day.
Investing time in finding the right bra size is an investment in your overall well-being, confidence, and comfort. Say goodbye to bras that pinch, dig, or provide inadequate support. Embrace bras that make you feel beautiful, confident, and supported from morning until night.
So, go forth and find the bra that makes you feel amazing. Happy bra shopping!
