Home>How-to Guides>For Women>How To Put On A Cross Back Bra By Yourself

For Women
How To Put On A Cross Back Bra By Yourself
Modified: August 5, 2023
Discover step-by-step instructions on how to effortlessly wear a cross back bra by yourself, designed specifically for women.
(Many of the links in this article redirect to a specific reviewed product. Your purchase of these products through affiliate links helps to generate commission for Under-tec.com, at no extra cost. Learn more)
Table of Contents
Introduction
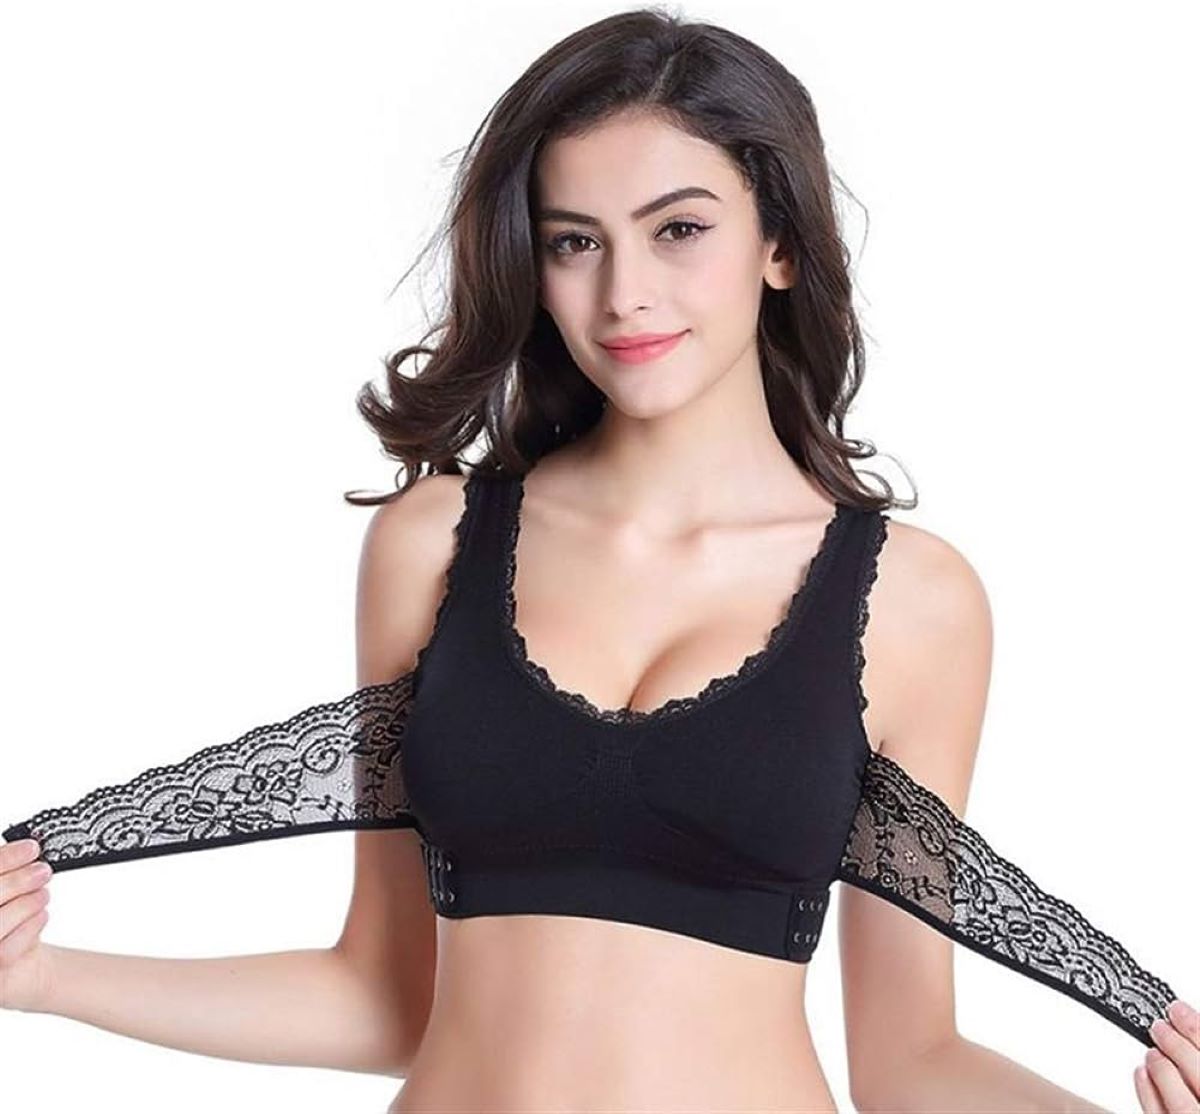
Welcome to our guide on how to put on a cross back bra by yourself. Sometimes, it can be a struggle to maneuver into certain types of bras, especially those with intricate strap designs. The cross back bra is a popular choice among women due to its stylish look and added support. However, the unique design of the straps can make it a bit challenging to put on without assistance.
The good news is that with a little practice and the right technique, you can easily conquer the task of putting on a cross back bra by yourself. In this article, we will walk you through the step-by-step process and provide helpful tips along the way to ensure a smooth and successful experience.
Whether you’re getting ready for a workout, a special occasion, or simply prefer the comfort and support of a cross back bra, this guide will give you the confidence to tackle it on your own. So, let’s get started and learn how to put on a cross back bra like a pro!
Step 1: Setting Up
Before you begin putting on your cross back bra, it is important to ensure that you are in the right environment. Here’s what you need to do to set yourself up for success:
- Select the Right Size: Make sure you have a cross back bra that fits you properly. If you’re unsure about your size, refer to a bra size chart or get professionally measured. Wearing the right size bra will not only provide comfort but also ensure optimal support.
- Choose an Appropriate Location: Find a clean and well-lit area where you can easily see what you’re doing. Standing in front of a mirror or using a full-length mirror will allow you to observe and adjust the bra straps and band effectively.
- Unhook the Bra: If it’s a new bra, there may be additional clasps or hook and eye closures that need to be undone. Take a moment to familiarize yourself with the bra’s closure system before proceeding.
- Adjust the Straps: To start, loosen the straps of the bra to provide ample space for slipping your arms through. You can tighten them later for a proper fit.
By following these simple steps, you will ensure that you have the necessary preparations in place to confidently put on your cross back bra.
Step 2: Slipping Your Arms Through the Straps
Once you have set up the right environment and adjusted the straps, it’s time to slip your arms through the straps of your cross back bra. Follow these steps:
- Bring the Bra to the Front: Hold the bra with the cups facing your torso and the back of the bra against your chest.
- Slip One Arm Through: Start by sliding one arm through the strap on the same side. Gently guide your arm through until the strap rests comfortably on your shoulder.
- Repeat for the Other Arm: Now, slip your other arm through the remaining strap on the opposite side. Allow the strap to rest securely on your shoulder, making sure it is not twisted or tangled.
- Adjust the Cups: Once both arms are through the straps, lean forward slightly and use your hands to adjust the cups. Lift and position your breasts to ensure they are centered within the cups for optimal support and comfort.
Remember to move with caution, especially if you’re wearing a new bra or haven’t worn a cross back style before. Take your time to familiarize yourself with the straps and their placement on your shoulders.
If you’re finding it difficult to slip your arms through the straps, try adjusting the strap length or asking someone for assistance. With practice, you’ll become more comfortable and proficient at this step.
Step 3: Adjusting the Straps
After slipping your arms through the straps, it’s time to adjust them to ensure a comfortable and supportive fit. Properly adjusted straps will prevent them from digging into your shoulders or slipping off during wear. Follow these steps to adjust the straps of your cross back bra:
- Tighten or Loosen the Straps: Begin by assessing the strap length. Use your fingers to adjust the straps on each shoulder simultaneously. Slowly tighten or loosen them until you achieve the desired level of support and comfort. The straps should be snug against your shoulders, providing lift and support without causing discomfort or digging into your skin.
- Check for Symmetry: Ensure that the straps on both sides are adjusted to the same length for a balanced fit. This will prevent one side from feeling tighter or higher than the other, ensuring a comfortable and even distribution of support.
- Test for Flexibility: Move your arms around and test the flexibility of the bra. If the straps feel too tight or restrictive, simply loosen them slightly until you feel comfortable and can move freely.
It’s essential to find the right balance with strap adjustment. Straps that are too loose may cause the bra to sag or provide insufficient support, while straps that are too tight may leave marks on your shoulders or cause discomfort. Take the time to find the perfect fit for your body.
Remember, everyone’s body is unique, so what works for someone else may not work for you. Don’t be afraid to experiment with different strap lengths until you find the perfect fit that offers both support and comfort.
Step 4: Securing the Band in the Back
With the straps adjusted, it’s time to secure the band of your cross back bra in the back. Follow these steps to ensure a snug and secure fit:
- Wrap the Bra Around Your Torso: Bring the bra around your back and position it just below your shoulder blades. The band should be parallel to the ground.
- Fasten the Hooks or Closures: Use one hand to hold the bra in place while using the other hand to fasten the hooks or closures. Start at the loosest setting and gradually tighten it for a snug fit. Ensure that the band is comfortably secured, sitting parallel to the ground and lying flat against your skin.
- Adjustment of the Band: Check the position of the band and make any necessary adjustments. The band should be snug enough to provide support but not excessively tight. If it feels too loose or too tight, unfasten the hooks or closures and readjust accordingly.
Keep in mind that it might take a few tries to find the right level of tightness with the band. It should feel comfortable and secure, without causing any discomfort or leaving indentations on your skin.
Take a moment to assess the fit of the band. Make sure it is level all the way around your torso, sitting parallel to the ground and resting securely against your body. If the band rides up or feels loose, it may be an indication that you need to adjust the straps or try a different size.
Now that the band is securely fastened, you’re one step closer to achieving the perfect fit with your cross back bra.
Step 5: Adjusting for Comfort
Once you have secured the band and adjusted the straps, it’s time to make final adjustments for comfort. Follow these steps to ensure that your cross back bra feels comfortable and supportive:
- Check the Band: Make sure the band feels secure but not overly tight. It should sit comfortably around your torso, providing support without causing discomfort or constriction.
- Assess Cup Placement: Take a moment to adjust the cups so that they fully encompass your breasts. They should cover the entire breast without any spillage or gaps, ensuring a proper fit and support.
- Test for Movement: Move around, raise your arms, and lean forward to test the flexibility and comfort of the bra. It should stay securely in place without any shifting or discomfort. If you feel any pinching, digging, or rubbing, make further adjustments to straps, band tightness, or cup position.
During this step, pay attention to how the bra feels on your body. It should provide ample support and comfort throughout the day, allowing you to move with ease and confidence.
Remember that everyone’s comfort preferences and body shapes are different. Take the time to adjust the straps, band, and cups according to your unique needs. What feels comfortable for one person may not be the same for another, so trust your instincts and make modifications until you find the perfect fit.
Now that you have adjusted for comfort, you’re ready to enjoy the support and style of your cross back bra!
Conclusion
Congratulations! You have successfully learned how to put on a cross back bra by yourself. By following the step-by-step process outlined in this guide, you can confidently tackle the challenge of maneuvering into this stylish and supportive bra style.
Remember, the key to successfully putting on a cross back bra is setting up the right environment, slipping your arms through the straps, adjusting the straps for comfort, securing the band in the back, and making final adjustments for a perfect fit.
Putting on a cross back bra by yourself may require a bit of practice, especially if you are new to this style. Don’t get discouraged if it takes a few tries to find the perfect fit and achieve the desired level of comfort. Over time, you will become more proficient and efficient at this process.
Now that you have mastered the art of putting on a cross back bra, you can confidently embrace this stylish and supportive undergarment for any occasion. Whether you’re heading to the gym, attending a special event, or simply want added comfort and support, your cross back bra is sure to become a staple in your lingerie collection.
Enjoy the comfort, support, and confidence that comes with wearing a well-fitted cross back bra. Embrace your unique style and rock your look with confidence. You’ve got this!