Home>How-to Guides>For Women>How To Crochet A Bra
For Women
How To Crochet A Bra
Published: July 31, 2023
Learn how to crochet a comfortable and stylish bra designed specifically for women. Step-by-step instructions and helpful tips for a perfect fit.
(Many of the links in this article redirect to a specific reviewed product. Your purchase of these products through affiliate links helps to generate commission for Under-tec.com, at no extra cost. Learn more)
Table of Contents
Introduction
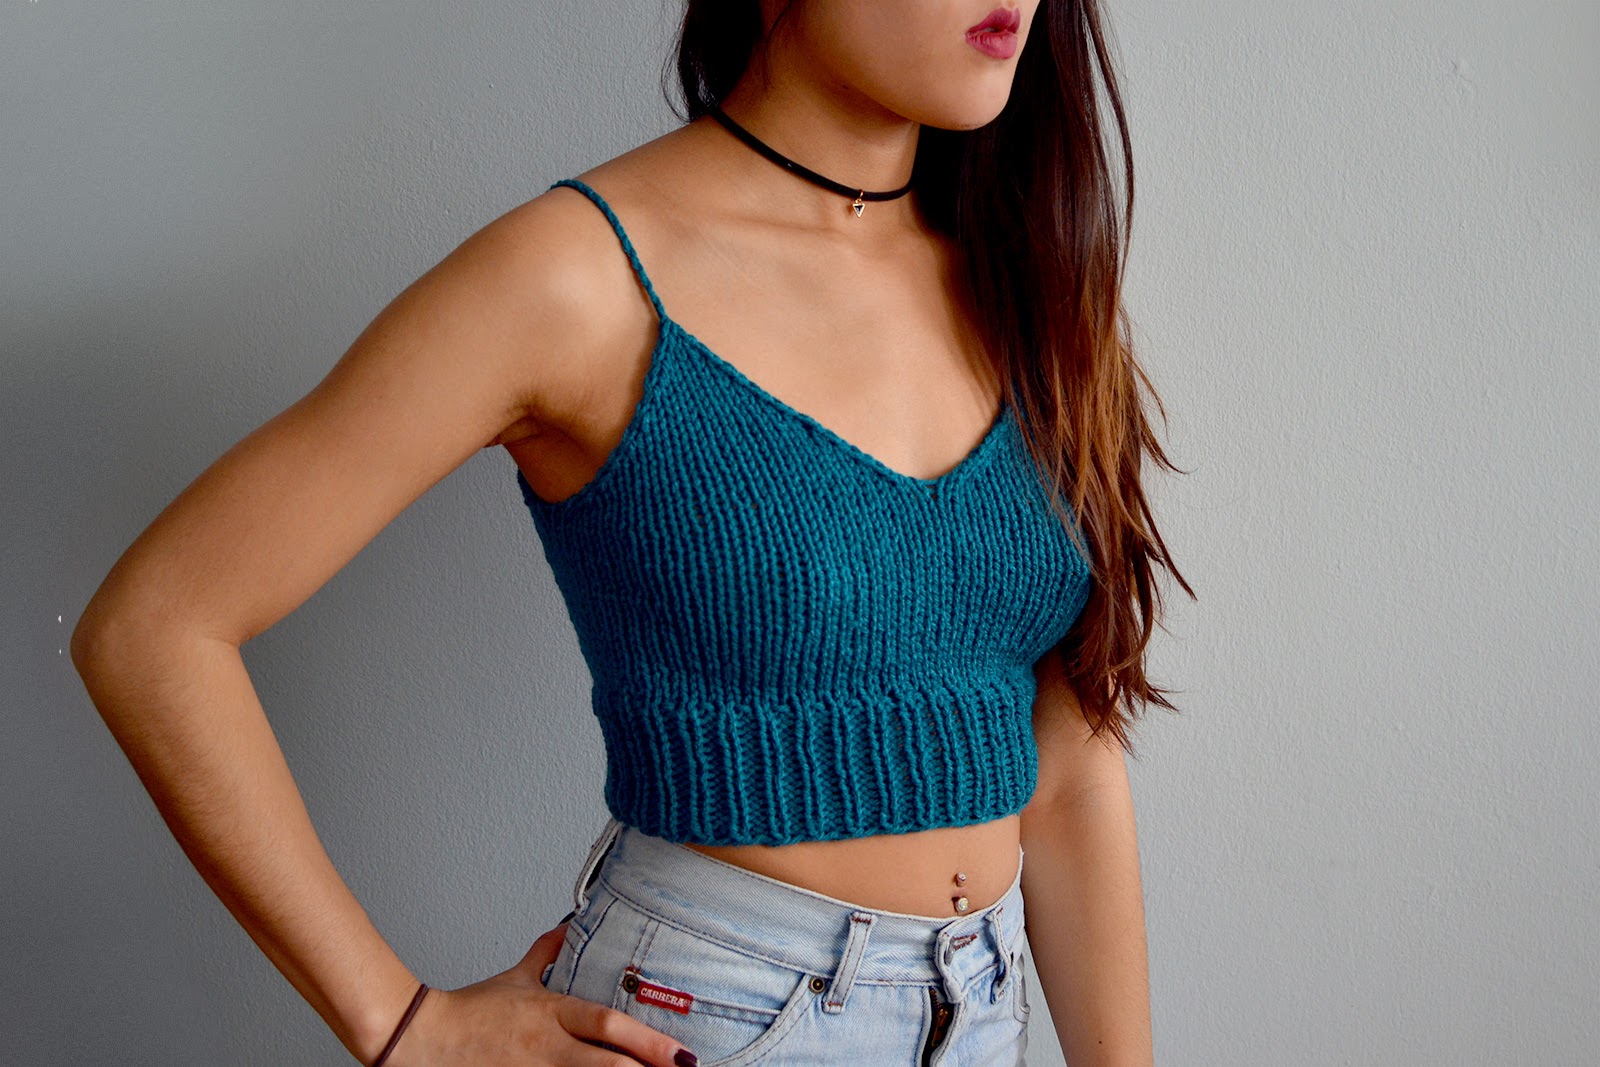
Welcome to the world of crochet, where creativity and practicality come together to form beautiful and functional pieces. If you’re looking for a unique and customized undergarment, crocheting a bra can be a rewarding project. Not only will you have a bra that is tailored to your measurements and style preference, but you’ll also have the satisfaction of creating something with your own hands.
Crocheting a bra may seem like a daunting task, but with the right materials and some basic crochet skills, it’s a project that can be accomplished by beginners and experienced crocheters alike. In this article, we’ll guide you through the process of crocheting a bra step by step, ensuring that you have all the information you need to create a comfortable and stylish piece.
Before we get started, it’s important to note that crocheted bras are primarily intended for loungewear or as a fashion statement. They may not provide the same level of support as commercially manufactured bras, especially for those with larger busts. However, if you’re looking for a comfortable and unique alternative to traditional bras, crocheting your own can be a fun and rewarding project.
In the next few sections, we’ll cover everything you need to know to get started, from measuring and choosing the right size, to gathering the necessary supplies, and finally, crocheting the bra itself. So, grab your crochet hook, pick out your favorite yarn, and let’s get started on creating a one-of-a-kind crochet bra!
Materials Needed
Before you begin crocheting your bra, it’s important to gather all the necessary materials. Here’s a list of items you’ll need:
- Crochet hook: Choose a hook size that matches the recommended gauge for your chosen yarn. Typically, a hook size between F-5 (3.75mm) and H-8 (5mm) works well for most crochet projects.
- Yarn: Select a yarn that is comfortable against the skin and appropriate for your desired level of support. Cotton or bamboo blends are popular choices for bras as they are breathable and offer some stretch.
- Elastic: You’ll need elastic for the underbust band and the straps. Opt for a soft and flexible elastic that is comfortable against the skin. You can find elastic specifically made for undergarments at fabric or craft stores.
- Measuring tape: Accurate measurements are key to ensuring a proper fit. Use a flexible measuring tape to measure your underbust, bust, and desired strap length.
- Scissors: A good pair of scissors will come in handy for cutting yarn, elastic, and any other materials you may need to trim.
- Sewing needle: You’ll need a needle with a large eye to weave in loose ends and attach the elastic. A tapestry needle or a yarn needle works well for this purpose.
- Optional: If you want to add some decorative elements to your bra, consider embellishments like ribbons, beads, or buttons.
Make sure you have all the materials ready before you start crocheting. This will help you maintain the flow of your project and avoid unnecessary interruptions.
Now that you have your materials ready, let’s move on to the next steps and start crocheting your bra!
Step 1: Measure and Choose Size
Before you begin crocheting your bra, it’s important to take accurate measurements to ensure a proper fit. Here’s how you can measure yourself and choose the right size:
- Underbust Measurement: Wrap a measuring tape snugly around your ribcage, just below your bust. Make sure the tape is parallel to the ground and doesn’t dig into your skin. Note down the measurement in inches or centimeters, whichever you prefer.
- Bust Measurement: Place the measuring tape around the fullest part of your bust, where your breasts are the largest. Again, ensure that the tape is parallel to the ground and not too tight or too loose. Write down this measurement.
- Choosing the Size: Use the underbust and bust measurements to determine your bra size. If your underbust measurement falls between band sizes, round up to the nearest even number. For example, if your underbust measures 32 inches, you’ll select a size 34 band. Then, subtract your underbust measurement from your bust measurement. The difference will correspond to a cup size. Use a bra size calculator or refer to a bra size chart to find your exact size.
It’s important to note that bra sizing can vary depending on the brand and style. It’s always a good idea to try on different sizes and styles to find the most comfortable fit.
Keep in mind that crocheted bras may have less stretch and support compared to commercially manufactured bras. If you prefer a snugger fit, consider selecting a smaller band size or adding additional elastic for added support.
By taking accurate measurements and choosing the right size, you’ll be well-equipped to create a bra that fits you perfectly. Now, let’s move on to the next step and gather the necessary supplies for crocheting your bra.
Step 2: Gather Supplies
Now that you have your measurements and bra size figured out, it’s time to gather all the supplies you’ll need to crochet your bra:
- Crochet Hook: Choose a hook size that matches the recommended gauge for your chosen yarn. The right hook size will ensure that your stitches are the correct size and your bra will fit properly.
- Yarn: Select a yarn that is soft, comfortable, and appropriate for lingerie or undergarments. Opt for a yarn that has some stretch and is breathable for added comfort. Cotton or bamboo blends are popular choices.
- Elastic: You’ll need elastic for the underbust band and the straps. Look for a soft and flexible elastic that will be comfortable against your skin. Wide elastic bands are typically used for the underbust band, while narrower elastic is suitable for the straps. Make sure to choose elastic that matches or complements the color of your yarn.
- Measuring Tape: A flexible measuring tape is essential for accurately measuring yourself and ensuring a proper fit for your bra. Use it to measure your underbust, bust, and desired strap length.
- Scissors: A good pair of scissors is necessary for cutting the yarn, elastic, and any other materials you may need to trim during the crocheting process.
- Sewing Needle: You’ll need a needle with a large eye to weave in loose ends and attach the elastic. A tapestry needle or a yarn needle works well for this purpose.
- Optional Embellishments: If you want to add a personal touch to your crocheted bra, consider embellishments like ribbons, beads, or buttons. These can add a decorative element and enhance the overall look of your bra.
Make sure you have all the supplies ready before you start crocheting. This will help ensure a smooth and uninterrupted crocheting process.
Now that you have all your supplies gathered, it’s time to move on to the next step and start creating the base of your crocheted bra.
Step 3: Create the Base
Now that you have your supplies ready, it’s time to create the base of your crocheted bra. The base provides the foundation for the cups and helps determine the overall fit of the bra. Follow these steps to create the base:
- Start with a foundation chain: Using your chosen yarn, make a foundation chain that is the length of your underbust measurement. This will form the bottom edge of the base.
- Create a row of single crochet stitches: Working in the second chain from the hook, make single crochet stitches across the foundation chain. This row will determine the width of the base.
- Continue with single crochet stitches: Repeat the previous row of single crochet stitches until the base reaches your desired width. To check the fit, wrap the base around your body under the bust to ensure it is snug but not too tight.
- Join the ends: Once the base is the desired size, join the ends together to form a circle. Slip stitch or sew the last stitch of the row to the first stitch to create a seamless join.
At this point, you have created the base of your crocheted bra. This will serve as the starting point for the cups and other elements of the bra. Make sure the base fits comfortably and securely around your underbust before moving on to the next step.
Now that the base is complete, you’re ready to move on to crocheting the cups of your bra. This is where the customization and shaping of your bra really begin to take shape. Stay tuned for the next step where we’ll tackle creating the cups!
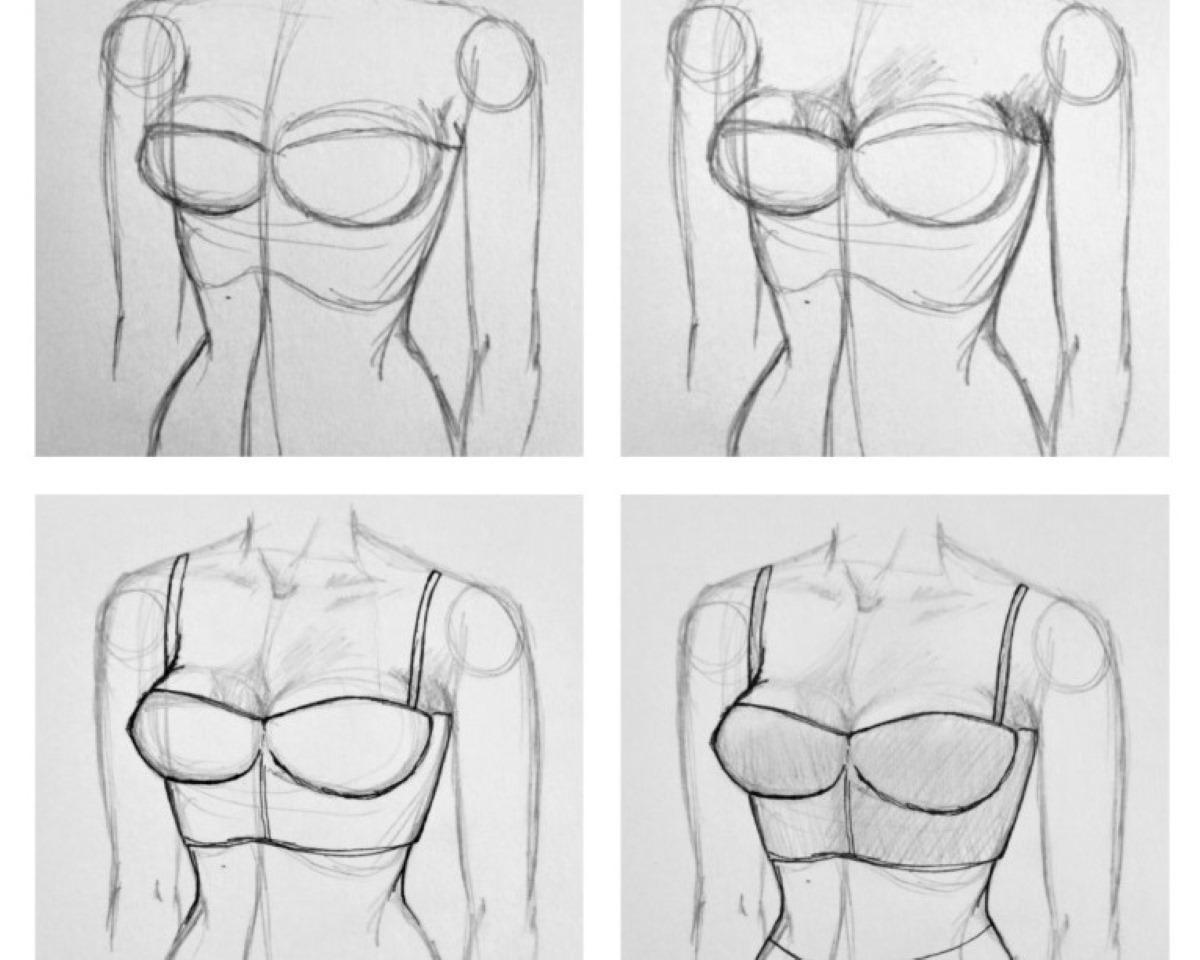
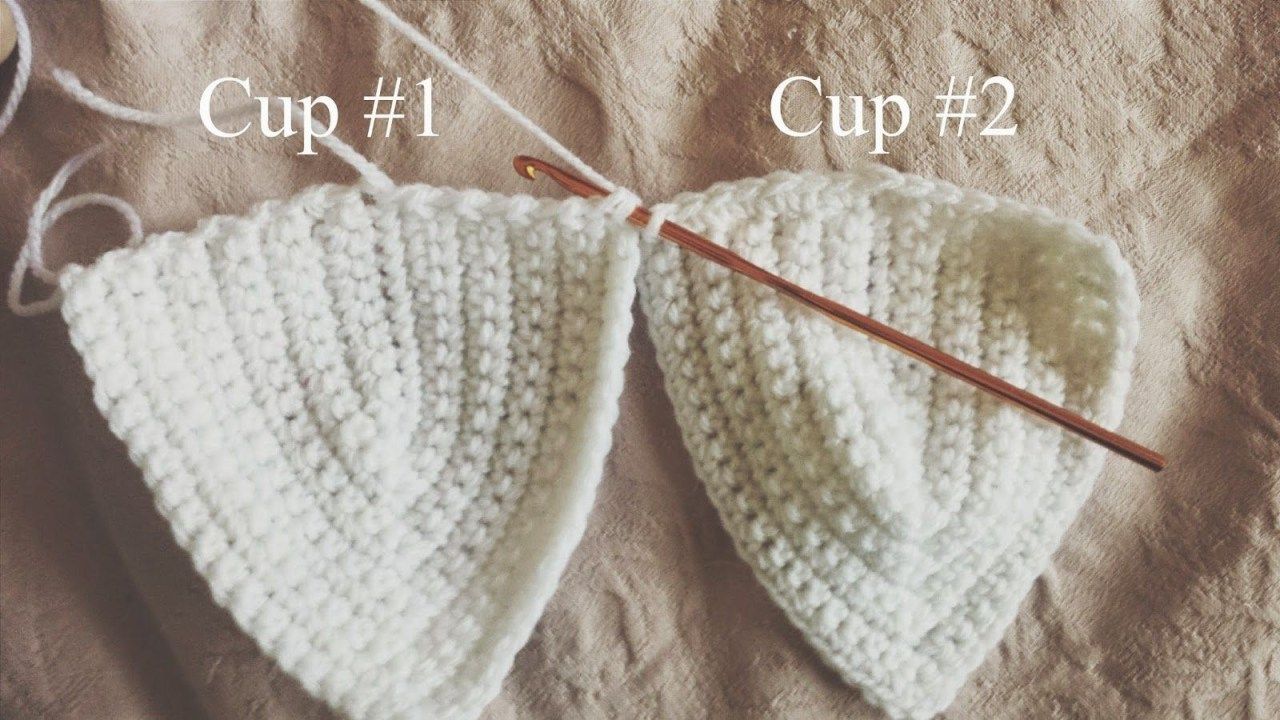
Step 4: Crochet the Cups
Now that you have the base of your crocheted bra completed, it’s time to crochet the cups. Here’s how you can do it:
- Attach your yarn: Begin by attaching your yarn at the center of the base, between the cups. You can either start with a slip knot or a standing single crochet stitch.
- Work in the round: Start crocheting in the round, making sure to follow the pattern or stitch instructions for your chosen bra design. Common stitches used for crocheting cups include single crochet, half double crochet, or double crochet stitches. Work your way around the base, increasing stitches evenly to form the cup shape.
- Try it on for size: After a few rounds, try on the bra to check the fit and adjust accordingly. If the cups are too small, you can add additional rounds with increases. If they are too big, you can decrease the number of stitches or switch to a smaller hook size.
- Continue until desired cup size is achieved: Keep crocheting in the round, following the pattern or stitch instructions, until you’ve reached your desired cup size. Remember to try on the bra periodically to ensure a proper fit.
- Finish off: Once the cups are completed, finish off the yarn and weave in any loose ends with a needle. Make sure the cups are symmetrical and have a smooth and even stitch pattern.
It’s important to note that cup sizes may vary based on individual preferences and desired coverage. Adjustments can be made by adding or reducing rounds and stitches as needed.
Now that you have successfully created the cups of your crocheted bra, it’s time to move on to adding adjustable straps to provide additional support and ensure a comfortable fit. Stay tuned for the next step!
Step 5: Add Adjustable Straps
Adding adjustable straps to your crocheted bra is an important step to ensure a comfortable and customizable fit. Adjustable straps allow you to achieve the perfect amount of support and can be easily adjusted to suit your individual needs. Here’s how you can add adjustable straps to your crocheted bra:
- Determine the desired strap length: Measure the distance from the top edge of one cup, over your shoulder, and down to the top edge of the other cup. This will give you the desired length of your straps.
- Cut your chosen elastic: Use your measurements to cut two pieces of elastic for the straps. Make sure the length provides a comfortable fit and will allow for adjustments if needed.
- Attach the elastic to the bra: With a sewing needle and thread, attach one end of each elastic piece to the top edge of each cup. Ensure that the elastic is securely attached and won’t easily come undone.
- Add adjustable hardware: At the other end of each elastic strap, attach adjustable hardware such as sliders or rings. This will allow you to adjust the length of the straps as needed for a customized fit.
- Secure the straps: Once the adjustable hardware is attached, secure the ends of the elastic straps to the bottom edge of each cup. Use a sewing needle and thread to ensure a strong and secure connection.
Adjustable straps are not only practical but can also add a stylish touch to your crocheted bra. You can choose different colors or patterns for the elastic straps to match or complement your bra design.
Now that the adjustable straps are securely attached, your crocheted bra is almost complete! In the next step, we’ll outline some finishing touches to add those final details and make your bra truly unique.
Step 6: Finishing Touches
Now that you’ve completed the main components of your crocheted bra, it’s time to add some finishing touches to make it truly unique and polished. Here are some ideas for adding those final details:
- Embellishments: Consider adding embellishments such as ribbons, beads, or buttons to enhance the aesthetic appeal of your bra. You can sew these decorations onto the cups or straps for a personalized touch.
- Edging: Add a decorative edging to the top and bottom edges of the cups to give them a finished look. You can use a simple picot stitch or a scalloped edging to achieve this. Experiment with different stitch patterns and techniques to find the one that suits your style.
- Lining: If desired, you can add a lining to the cups for added comfort and coverage. Cut out fabric pieces in the shape of the cups and sew them into place. This will prevent any crochet stitches from scratching or irritating your skin.
- Adjustment options: If you wish to have more adjustable features on your bra, you can add hooks and eye closures to the back of the underbust band. This allows you to customize the fit and provides additional support.
- Blocking: Give your finished bra a professional touch by blocking it. Wet the bra with water, gently shape it to the desired size and shape, and let it dry. This will help the stitches settle and give your bra a more polished appearance.
Remember, these finishing touches are optional and can be customized based on your personal preferences and style. Feel free to get creative and explore different ideas to make your crocheted bra truly one-of-a-kind.
Congratulations on completing your crocheted bra! With the final touches added, it’s time to try it on and enjoy the comfort and satisfaction of wearing a handmade garment. Remember, this bra is a unique expression of your creative skills, and it’s something to be proud of.
Now that you’ve mastered the art of crocheting a bra, you can continue to explore different patterns, styles, and techniques to create more lingerie pieces. Happy crocheting!
Conclusion
Congratulations on completing your journey into the world of crocheting a bra! By following the steps outlined in this guide, you have successfully crafted a personalized and unique undergarment that fits your measurements and style preferences.
Crocheting a bra may have once seemed like a daunting task, but with the right materials and knowledge, you were able to create something beautiful and functional. From measuring and choosing the right size to crocheting the cups, adding adjustable straps, and adding finishing touches, you have mastered each step with confidence and creativity.
While crocheted bras may not provide the same level of support as commercially manufactured bras, they offer a comfortable and customizable alternative. Whether you wear your crocheted bra as loungewear or as a fashionable statement piece, you can take pride in knowing that you’ve created something with your own hands.
As you continue your crocheting journey, don’t be afraid to experiment with different patterns, stitches, and yarns to create more lingerie pieces that reflect your personal style. Crocheting is a versatile craft that allows you to explore your creativity and make unique pieces that are truly one-of-a-kind.
Remember to have fun with your projects and enjoy the process of creating something handmade. Crocheting is not just a hobby; it’s an art form that allows you to express yourself and bring joy to those who wear your creations.
So, grab your crochet hook, choose your favorite yarn, and let your imagination run wild as you embark on your next crocheting adventure. Happy crocheting!