Home>How-to Guides>For All>How To Draw A Kimono
For All
How To Draw A Kimono
Modified: August 2, 2023
Learn how to draw a kimono for all occasions with our easy step-by-step guide and unleash your artistic skills. Impress everyone with your stunning creations.
(Many of the links in this article redirect to a specific reviewed product. Your purchase of these products through affiliate links helps to generate commission for Under-tec.com, at no extra cost. Learn more)
Table of Contents
Introduction
Welcome to this step-by-step guide on how to draw a kimono. The traditional Japanese garment known for its elegant and intricate designs has captivated people all over the world. Whether you have a passion for fashion illustration or simply want to explore your artistic skills, drawing a kimono can be a rewarding and enjoyable experience.
Drawing a kimono requires attention to detail and a good understanding of its structure. In this guide, we will walk you through each step, providing clear instructions and tips along the way. By the end of this tutorial, you will have a beautifully rendered kimono that showcases your creative talent.
To get started, you will need a few materials. Grab a pencil, eraser, and a set of markers or colored pencils for shading and adding vibrant details. Having a reference image or a real kimono as inspiration can be helpful, but feel free to let your imagination roam and create your own unique design.
So, let’s dive in and learn how to draw a stunning kimono that will impress both yourself and others.
Materials Needed
Before we get started on our kimono drawing, let’s gather the necessary materials. Here’s what you’ll need:
- A pencil: Use a standard graphite pencil for sketching and outlining the kimono.
- An eraser: Having an eraser handy will allow you to make corrections or adjustments during the drawing process.
- Markers or colored pencils: These tools will add depth and color to your kimono. Choose a set of markers or colored pencils that complement your desired color scheme.
- A reference image or a real kimono: While not essential, having a reference image or a real kimono can provide inspiration and help you understand the intricate details of the garment.
Now that we have all the materials ready, let’s move on to the next step: sketching the outline of the kimono.
Step 1: Sketch the Outline
The first step in drawing a kimono is to sketch out the basic outline. Start by lightly drawing a vertical line down the center of your paper. This line will serve as the guide for the kimono’s symmetry.
Next, draw two horizontal lines near the top and bottom of the vertical line to represent the shoulder and hemline of the kimono. These lines will help you maintain the proportion and shape of the garment.
Once you have the basic guidelines in place, begin sketching the shape of the kimono. Start at the top by drawing a curved line from the shoulder line towards the center. Repeat this process on the opposite side to create the other shoulder.
Continue drawing the outer edges of the kimono, following the general shape of a T-shirt. Keep the lines smooth and fluid, taking care to maintain the symmetry of the garment. Remember, the kimono should have wide and flowing sleeves.
Once you are satisfied with the overall shape of the kimono, refine the outline, making it bolder and more defined. Erase any unnecessary guidelines that you no longer need.
With the outline complete, you now have a solid foundation to build upon. In the next step, we will focus on drawing the collar of the kimono.
Step 2: Draw the Collar
The collar, known as the “eri” in Japanese, is an important feature of the kimono. It adds structure and elegance to the garment. In this step, we will focus on drawing the collar.
Start by extending the lines of the kimono’s neckline upwards to create the collar. The collar can be drawn in different styles, such as a straight or curved shape. Experiment with different designs to find the one that suits your vision.
Once you have the basic shape of the collar, add some details to enhance its appearance. Traditional kimono collars often have decorative patterns or embroidery. You can draw these patterns as thin lines or small shapes along the collar’s edges.
When drawing the collar, keep in mind that it extends all the way to the edges of the kimono’s sleeves. This creates a seamless and continuous flow from the collar to the sleeves, giving the kimono a unified look.
After completing the collar, take a step back and assess your drawing. Make any necessary adjustments to ensure that the collar is well-proportioned and adds the desired aesthetic to your kimono.
With the collar complete, we can now move on to the next step: adding sleeves to our kimono.
Step 3: Add Sleeves
Sleeves are a defining feature of the kimono and contribute to its graceful and flowing appearance. In this step, we will focus on adding sleeves to our kimono drawing.
Start by drawing two curved lines extending from the shoulder area down towards the hemline of the kimono. These lines will form the basic shape of the sleeves. Remember that kimono sleeves are typically wide and loose.
Next, add more definition to the sleeves by drawing another set of curved lines inside the initial ones. These lines will represent the folds and layers of fabric that give the sleeves their beautiful drape. Be mindful of the placement and direction of these lines to create a realistic and visually appealing effect.
Take some time to observe the characteristics of various kimono sleeve styles. Traditional kimono sleeves can have different lengths, ranging from shorter to longer designs. Additionally, some kimono sleeves may be tied or folded in specific ways, such as in the case of the furisode kimono.
Once you are satisfied with the shape and details of the sleeves, refine the lines to make them more defined. Erase any overlapping lines or unnecessary guidelines that you may have drawn in the process.
With the sleeves added, your kimono is beginning to take shape. In the next step, we will focus on drawing the obi, which is the decorative belt that wraps around the waist.
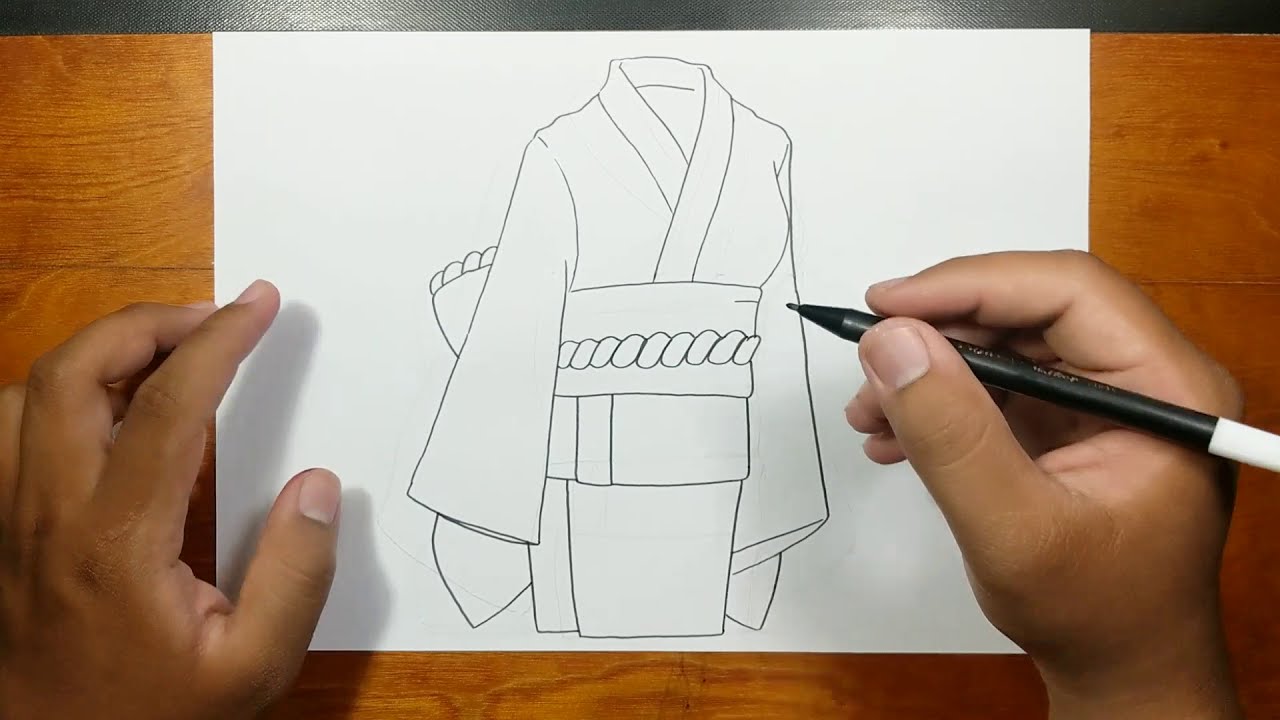
Step 4: Draw the Obi (Belt)
The obi, or belt, is a prominent feature of the kimono and adds a touch of elegance to the garment. In this step, we will focus on drawing the obi.
Start by drawing a wide, horizontal rectangle around the waist area of the kimono. The size and width of the obi can vary depending on the style you want to depict. Experiment with different widths and positions to find the look that you prefer.
Once you have the basic shape of the obi, you can add more intricate details to enhance its appearance. Traditional obi designs often feature patterns or motifs that are characteristic of Japanese culture. You can draw these patterns as lines, geometric shapes, or even floral motifs, depending on your artistic style.
Remember that the obi is typically tied in a bow at the back of the kimono. You can add additional lines to show the knot and the ends of the obi hanging down.
Take a step back and assess the proportion and placement of the obi. Adjust the size and position as needed to ensure it complements the overall design of the kimono.
With the obi successfully drawn, your kimono is now taking on its complete form. In the next step, we will focus on adding decorative patterns and details to make the kimono visually appealing.
Step 5: Decorate the Kimono
Now that the basic structure of the kimono is complete, it’s time to add decorative patterns and details to bring it to life. This step is where your creativity can truly shine as you create a unique design for your kimono.
Start by considering the type of patterns or motifs you want to incorporate. Traditional kimono designs often feature floral patterns, geometric shapes, or nature-inspired elements. However, feel free to explore different themes and ideas that resonate with your artistic vision.
Once you have chosen a pattern, begin adding the details to the kimono. You can use thin, curving lines to draw intricate floral designs or simple geometric shapes to create a more modern look. Remember to be consistent with the style and overall aesthetic of your kimono.
Consider the placement of the patterns on the kimono. Many traditional kimono designs feature a central motif on the back, as well as smaller patterns along the collar and sleeves. However, there are no strict rules, so let your imagination guide you in creating a visually appealing composition.
As you add the decorative elements, pay attention to the colors as well. Traditional kimono designs often incorporate vibrant and contrasting colors, but you can also opt for a more muted color palette or experiment with a monochromatic approach.
Take your time during this step and enjoy the process of adding the decorative details. Don’t be afraid to make mistakes or try out different ideas. Remember, this is your chance to make your kimono truly unique and personalized.
With the decorative patterns and details in place, your kimono is almost complete. In the next and final step, we will focus on finalizing the details to ensure a polished and finished drawing.
Step 6: Finalize the Details
In this final step, it’s time to add the finishing touches and fine-tune the details of your kimono drawing.
Start by reviewing your drawing and making any necessary adjustments. Look for any areas that may need more definition or refinement. Use your eraser to remove any stray lines or smudges.
Next, focus on adding shading to your kimono to give it depth and dimension. Pay attention to the light source and imagine where shadows would fall on the fabric. Use your markers or colored pencils to carefully add shading to the appropriate areas. You can create a gradient effect by applying lighter pressure for lighter shades and heavier pressure for darker shades.
Consider adding additional details to enhance the realism of your kimono. This could include adding texture to the fabric, such as creases or wrinkles, or incorporating subtle patterns within the decorative elements.
Take a step back and assess your drawing as a whole. Make any final adjustments to ensure that the proportions, colors, and overall composition are visually appealing.
Lastly, consider adding a background or context to your kimono drawing. This could be a simple patterned backdrop, a traditional Japanese setting, or any other element that complements your design. The background can enhance the overall feel and story of your artwork.
Remember, your drawing is a reflection of your creativity and artistic interpretation. Don’t be afraid to experiment, try new techniques, or incorporate your personal style into the final details.
With the details finalized, step back and admire your completed kimono drawing. You have successfully learned how to draw a beautiful kimono from start to finish. Congratulations on your artistic accomplishment!
Conclusion
Congratulations on completing your journey of drawing a stunning kimono! Throughout this step-by-step guide, we have explored the process of sketching the outline, drawing the collar, adding sleeves, creating the obi (belt), decorating the kimono with patterns, and finalizing the details. By following these steps, you have gained the skills and knowledge to create beautiful kimono illustrations.
Remember that practice makes perfect. The more you explore different kimono styles, patterns, and details, the more comfortable and confident you will become in your drawing abilities. Don’t be afraid to experiment, adapt, and let your creativity run wild. Each kimono drawing is an opportunity for self-expression and artistic exploration.
As you continue on your artistic journey, take inspiration from traditional kimono designs, but also allow your own unique style to shine through. Add your personal touch and make each kimono drawing a representation of your artistic voice.
Finally, don’t forget to share your beautiful kimono artwork with others. Showcase it on social media platforms, enter it into art exhibitions, or even create personalized cards or gifts for loved ones. Your talent deserves to be celebrated and admired.
Thank you for joining us on this artistic adventure. We hope you have enjoyed learning how to draw a kimono and that this guide has fueled your passion for art and creativity. Happy drawing!