Home>How-to Guides>For Women>How To Fix A Bra Wire
For Women
How To Fix A Bra Wire
Published: July 31, 2023
Learn how to easily fix a bra wire for women. Fixing a bra wire is quick and simple with the right steps and tools.
(Many of the links in this article redirect to a specific reviewed product. Your purchase of these products through affiliate links helps to generate commission for Under-tec.com, at no extra cost. Learn more)
Table of Contents
- Introduction
- Why Bra Wires Come Out
- Tools Required for Fixing a Bra Wire
- Step 1: Identifying the Problem
- Step 2: Preparing the Necessary Supplies
- Step 3: Finding the Wire’s Exit Point
- Step 4: Retrieving the Wire Using Tweezers or Pliers
- Step 5: Securing the Wire Back in Place
- Step 6: Reinforcing the Damaged Area
- Step 7: Test and Adjust for Comfort
- Conclusion
Introduction
A bra wire is an essential component that provides support and shape to a woman’s bra. However, it is not uncommon for the wire to come out or poke through the fabric, causing discomfort and frustration. If you’ve experienced this issue, you’re not alone, and the good news is that there are ways to fix it.
When a bra wire comes out, it can be a nuisance and make the bra unwearable. However, before rushing to replace the bra, it is worth attempting to fix the wire yourself. Not only will this save you money by extending the life of your favorite bras, but it will also give you the satisfaction of being able to resolve the problem on your own.
In this article, we will guide you through the steps to fix a bra wire and make your bra wearable again. We’ll explain why bra wires come out, the tools you’ll need, and provide step-by-step instructions on how to fix the problem. So, let’s get started and rescue your bra from wire troubles!
Why Bra Wires Come Out
If you’ve ever wondered why bra wires come out, you’re not alone. It can be frustrating when the wire that was once securely nestled within the fabric suddenly decides to make an appearance. There are several reasons why this happens:
- Wear and Tear: Over time, the repeated stress and movement can cause the fabric and stitching around the wire channel to weaken, leading to the wire poking through.
- Incorrect Washing: Improper washing, such as using a washing machine or dryer, can damage the delicate fabric and cause the wire to come loose.
- Incorrect Bra Size: Wearing the wrong bra size can put excessive pressure on the underwire, increasing the likelihood of it popping out.
- Manufacturing Defects: In some cases, the issue may be due to a defect in the bra’s construction, such as poor stitching or weak fabric.
Understanding the reasons behind the problem can help you take preventive measures to reduce the chances of bra wires coming out in the future. However, it’s important to note that even with proper care, bra wires may still come loose over time due to normal wear and tear.
In the next section, we will discuss the tools you will need to fix a bra wire.
Tools Required for Fixing a Bra Wire
Before you can begin fixing a bra wire, it’s important to gather the necessary tools. Having these tools at hand will make the process smoother and help you achieve the best results. Here are the tools you will need:
- Tweezers or Pliers: These tools are essential for retrieving the wire from where it has come out and maneuvering it back into place.
- Needle and Thread: If the wire has caused any damage to the fabric, you will need a needle and thread to repair it. Choose a thread that matches the color of your bra for a seamless mend.
- Safety Pins: Safety pins can be used to temporarily secure the wire in place while you make the necessary repairs.
- Scissors: A pair of small, sharp scissors will come in handy for trimming any excess wire or thread.
- Seam Ripper: If the wire has become stuck in the fabric and cannot be easily retrieved, a seam ripper can help you gently open the fabric without causing additional damage.
Having these tools readily available will save you time and ensure that you can fix your bra wire effectively. It’s a good idea to create a small sewing kit specifically for bra repairs, so you have everything you need conveniently in one place.
Now that you’ve gathered the necessary tools, let’s move on to the step-by-step process of fixing a bra wire.
Step 1: Identifying the Problem
The first step in fixing a bra wire is to identify where the issue lies. Sometimes, the wire may have completely come out of the fabric, while in other cases, it may have only partially protruded. Begin by examining your bra carefully to determine the extent of the problem.
Here’s what you should look for:
- Protruding Wire: Check if the wire is visibly poking out of the fabric. This usually happens near the underarm area or at the center between the cups.
- Uncomfortable or Poking Sensation: If you feel discomfort or a poking sensation while wearing the bra, it is likely that the wire has come out or shifted out of position.
- Visible Damage: Inspect the fabric for any signs of damage, such as small holes or fraying, which may indicate where the wire has come out.
It’s important to note that in some cases, the wire may have become lodged inside the fabric and is not easily visible. In such situations, you may need to gently feel around the fabric to locate the wire’s exit point.
Once you have identified the problem area and confirmed that the wire needs fixing, you are ready to move on to the next step: preparing the necessary supplies.
Step 2: Preparing the Necessary Supplies
Now that you have identified the problem with your bra wire, it’s time to gather the necessary supplies before proceeding with the repair. By preparing in advance, you can ensure a smooth and efficient process. Here’s what you’ll need:
- Tweezers or Pliers: These tools will help you to safely retrieve the wire from its current position.
- Needle and Thread: If the fabric has been damaged, you’ll need a needle and thread to mend it. Make sure to choose a thread that matches your bra color.
- Safety Pins: Safety pins can be used to temporarily secure the wire in place during repairs.
- Scissors: A pair of small, sharp scissors will come in handy for trimming excess wire or thread.
- Seam Ripper: If the wire is stuck or trapped in the fabric, a seam ripper can help you open the fabric without causing further damage.
It is important to gather all the necessary materials before starting the repair process. This will save you time and prevent any unnecessary interruptions during the repair.
Once you have assembled all the supplies, you are ready to proceed to the next step: finding the wire’s exit point.
Step 3: Finding the Wire’s Exit Point
After preparing the necessary supplies, the next step in fixing a bra wire is to locate the wire’s exit point in the fabric. This is the area where the wire has come out or is poking through. Finding the exit point will help you retrieve the wire and guide it back into its proper place.
Here’s how to find the wire’s exit point:
- Inspect the bra fabric thoroughly, paying close attention to areas where the wire is most likely to come out, such as the underarm area or the center between the cups.
- Look for any visible signs of the wire poking through the fabric, such as a small hole or indentation.
- If the wire is not easily visible, gently feel around the fabric in the suspected areas to locate where the wire may have come out.
It’s important to be careful and gentle while searching for the wire’s exit point to avoid causing further damage to the bra or injuring yourself.
Once you have successfully identified the wire’s exit point, you can move on to the next step, which involves retrieving the wire using tweezers or pliers.
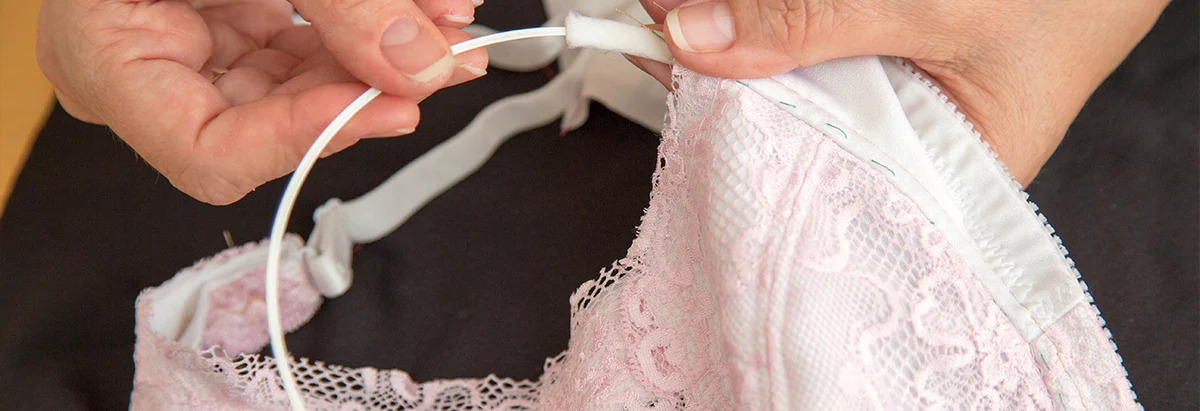
Step 4: Retrieving the Wire Using Tweezers or Pliers
Now that you have located the wire’s exit point, it’s time to retrieve the bra wire using tweezers or pliers. This step requires precision and patience to ensure the wire is safely removed without causing any additional damage to the fabric or yourself.
Follow these steps to retrieve the wire:
- Gently pull back the fabric around the wire’s exit point to expose more of the wire.
- Using tweezers or pliers, carefully grip the wire close to the exit point and slowly pull it back into the fabric.
- If the wire is firmly stuck or challenging to grip, you may need to use a gentle twisting motion while pulling to release it.
- Continue to pull the wire until it is entirely inside the fabric, making sure not to pull too forcefully or cause any damage.
It’s crucial to exercise caution while retrieving the wire, as excessive force or rough handling can lead to further damage. Take your time and work slowly to ensure a successful retrieval.
Once the wire has been safely retrieved, you can proceed to the next step, which involves securing the wire back in place.
Step 5: Securing the Wire Back in Place
After successfully retrieving the bra wire, the next step is to secure it back in its original position. This will ensure that the wire provides the necessary support and shape to your bra. Properly securing the wire will prevent it from coming out or poking through the fabric again.
Follow these steps to secure the wire:
- Inspect the area where the wire came out for any loose or frayed fabric. If necessary, use a needle and thread to mend any small holes or tears.
- Hold the wire in place and gently stretch the fabric to create tension in the area.
- Using a needle and thread, sew a few small stitches around the wire’s exit point to secure it back in place.
- Make sure to sew through the fabric layers above and below the wire to provide extra strength and stability.
- Continue stitching around the wire, creating a secure loop or zigzag pattern to anchor it firmly.
Take your time and ensure that the stitches are tight and secure. This will help prevent the wire from shifting or coming out again.
Once you have secured the wire, you can proceed to the next step, which involves reinforcing the damaged area.
Step 6: Reinforcing the Damaged Area
After securing the wire back in place, it’s important to reinforce the damaged area to prevent further wire protrusion or fabric damage. Reinforcing the area will add extra strength and stability to your bra, ensuring that the wire stays in place and the fabric remains intact.
Here’s how you can reinforce the damaged area:
- Cut a small piece of fabric or use a fabric patch that matches the color and texture of your bra.
- Place the fabric patch on the inside of the bra, directly over the damaged area.
- Using a needle and matching thread, sew around the edges of the fabric patch, attaching it securely to the bra fabric.
- Ensure that the stitches are small and tight to provide maximum reinforcement.
- Continue stitching until the fabric patch is securely attached and the damaged area is completely covered.
Reinforcing the damaged area will not only prevent the wire from poking through but also extend the life of your bra by preventing further fabric deterioration.
Once you have reinforced the damaged area, you are almost done! The last step is to test and adjust for comfort.
Step 7: Test and Adjust for Comfort
With the wire secured and the damaged area reinforced, it’s time to test your bra for comfort and make any necessary adjustments. This step will ensure that your bra feels comfortable to wear and that the repaired wire stays in its proper place.
Here’s what you should do to test and adjust for comfort:
- Put on the bra and assess how it feels. Pay attention to any areas of discomfort or poking sensations.
- Move around and engage in different activities to test the stability of the wire. If you feel any shifting or discomfort, make note of the specific area.
- If needed, gently adjust the position of the wire by using your fingers to push it slightly towards the center or outer edge, depending on where the adjustment is needed.
- Check the reinforced area for any signs of strain or pulling. If necessary, reinforce the area further to provide increased durability.
- Once you are satisfied with the comfort and stability of your bra, trim any excess wire or thread to ensure a clean finish.
It’s important to take the time to adjust and test your bra for optimal comfort. Remember that everyone’s body is unique, so making small adjustments according to your needs is perfectly normal.
Congratulations! You have successfully fixed your bra wire and made your bra wearable again. By following these steps and taking the necessary precautions, you can enjoy the support and comfort of your favorite bra once more.
Conclusion
Fixing a bra wire is a useful skill that can save you money and extend the life of your favorite bras. By following the steps outlined in this guide, you can confidently tackle the issue and make your bra wearable again.
Remember, before attempting to fix a bra wire, it’s important to identify the problem and gather the necessary tools. This includes tweezers or pliers, needle and thread, safety pins, scissors, and a seam ripper if needed.
The step-by-step process involves identifying the problem, preparing the supplies, finding the wire’s exit point, retrieving the wire using tweezers or pliers, securing it back in place, reinforcing the damaged area, and finally testing and adjusting for comfort.
Throughout the process, exercise patience and caution to avoid causing further damage or discomfort. Take your time to ensure that the wire is properly secured and the fabric is reinforced for durability.
Fixing a bra wire not only allows you to salvage your favorite bras but also gives you the satisfaction of being able to solve the problem yourself. So, the next time you encounter a bra wire issue, don’t worry – you’ve got the skills to handle it!
Remember to always take care of your bras and wash them according to the manufacturer’s instructions to minimize wear and tear. Additionally, regularly check your bras for any signs of wire damage or fabric strain to address any issues early on.
Now that you’ve learned how to fix a bra wire, you can confidently handle this common issue and continue to enjoy the comfort and support of your bras for a long time to come.