Home>How-to Guides>For Women>How To Make A Shirt Into A Bodysuit

For Women
How To Make A Shirt Into A Bodysuit
Published: July 31, 2023
Learn how to transform a shirt into a stylish bodysuit designed specifically for women. Step-by-step instructions and helpful tips to create a trendy wardrobe staple.
(Many of the links in this article redirect to a specific reviewed product. Your purchase of these products through affiliate links helps to generate commission for Under-tec.com, at no extra cost. Learn more)
Table of Contents
- How To Make A Shirt Into A Bodysuit
- How To Make A Shirt Into A Bodysuit
- How To Make A Shirt Into A Bodysuit
- How To Make A Shirt Into A Bodysuit
- How To Make A Shirt Into A Bodysuit
- How To Make A Shirt Into A Bodysuit
- How To Make A Shirt Into A Bodysuit
- How To Make A Shirt Into A Bodysuit
- How To Make A Shirt Into A Bodysuit
- Conclusion
How To Make A Shirt Into A Bodysuit
Transforming a regular shirt into a trendy bodysuit can be a fun and creative way to upcycle your wardrobe. Whether you want to repurpose an old shirt or give a new twist to your favorite tee, this DIY project is simple and rewarding. In just a few steps, you can have a fashionable bodysuit that flatters your figure and shows off your personal style.
To get started, you will need a few materials:
- A shirt that fits you well
- A sewing machine or needle and thread
- A pair of scissors
- Snaps or fasteners (optional)
- Pins
- Measuring tape
Once you have gathered your materials, follow these steps:
Step 1: Prepare the Shirt
Begin by laying the shirt flat on a table or work surface. Smooth out any wrinkles and make sure the front and back of the shirt are aligned.
Step 2: Cut the Bottom
Measure and mark the desired length for your bodysuit. Using a pair of sharp scissors, carefully cut across the bottom of the shirt at your marked length. Be sure to leave some extra fabric to hem the bottom.
Step 3: Sew the Bottom
Using a sewing machine or a needle and thread, fold over the bottom edge of the shirt and sew it in place to create a clean hem. This will prevent fraying and give your bodysuit a polished look.
Step 4: Cut and Sew the Sleeves
If you prefer a sleeveless bodysuit, skip this step. Otherwise, measure and mark the desired length for the sleeves. Cut off the existing sleeve of the shirt and hem the edges just like you did for the bottom. Attach the new sleeves to the shirt by sewing them along the armholes.
Step 5: Add Snaps or Fasteners
If you want easy access when using the restroom, consider adding snaps or fasteners to the crotch area of the bodysuit. This will allow you to easily open and close the bodysuit when necessary.
Step 6: Test and Adjust Fit
Put on the bodysuit and check the fit. If needed, make any adjustments by taking in the sides or shoulders. Use pins to temporarily secure any alterations and then sew them in place.
That’s it! You have successfully transformed a shirt into a stylish bodysuit. Now you can proudly wear your creation and show off your unique sense of fashion.
How To Make A Shirt Into A Bodysuit
Transforming a regular shirt into a trendy bodysuit can be a fun and creative way to upcycle your wardrobe. Whether you have an old shirt you no longer wear or want to give a unique twist to your favorite tee, this do-it-yourself project allows you to customize your clothing and bring new life to your outfits.
A bodysuit is a versatile piece of clothing that can be dressed up or down, making it suitable for various occasions. With some basic sewing skills and a few materials, you can create a fashionable bodysuit that accentuates your figure and allows you to express your personal style.
Not only is making a bodysuit a sustainable and cost-effective option, but it also gives you the freedom to design a unique garment that fits your body perfectly. By repurposing an existing shirt, you can save money and reduce waste, contributing to a more sustainable fashion industry.
In this step-by-step guide, we’ll walk you through the process of transforming a shirt into a bodysuit. You’ll learn how to prepare the shirt, cut and sew the bottom and sleeves, add snaps or fasteners for convenience, and test and adjust the fit to ensure a comfortable and flattering outcome.
Remember, this DIY project allows you to unleash your creativity and experiment with different shirt styles, colors, and patterns. So let’s get started and turn that ordinary shirt into an extraordinary bodysuit!
How To Make A Shirt Into A Bodysuit
Step 1: Gather Materials
Before you begin the process of transforming a shirt into a bodysuit, it’s essential to gather all the necessary materials. Here’s what you’ll need:
- A Shirt that Fits You Well: Choose a shirt that fits you comfortably and flatters your body shape. It can be a t-shirt, blouse, or even a button-down shirt. Make sure it’s in good condition and free of any stains or tears.
- A Sewing Machine or Needle and Thread: Having a sewing machine will make the process faster and more efficient. However, if you don’t have one, you can still sew the bodysuit using a needle and thread. Just make sure to have enough thread in a color that matches your shirt.
- A Pair of Scissors: You’ll need a sharp pair of scissors to cut the fabric of the shirt. Make sure they’re suitable for cutting through fabric without fraying the edges.
- Snaps or Fasteners (Optional): If you want easy access when using the restroom, consider adding snaps or fasteners to the crotch area of the bodysuit. This will allow you to open and close the bodysuit conveniently.
- Pins: Pins will come in handy to temporarily secure fabric and make adjustments before sewing. Make sure to have enough pins to work with.
- Measuring Tape: A measuring tape will help you take accurate measurements and ensure a proper fit for your bodysuit. It’s important to measure your desired length and the dimensions of your shirt before making any cuts.
By ensuring you have all the necessary materials for this project, you’ll be well-prepared to transform your shirt into a stylish bodysuit. Now that you’re ready to start, let’s move on to the next step: preparing the shirt.
How To Make A Shirt Into A Bodysuit
Step 2: Prepare the Shirt
Once you have gathered all the materials needed for the bodysuit transformation, it’s time to prepare the shirt for the alterations. Follow these steps:
- Lay the Shirt Flat: Start by laying the shirt flat on a table or work surface. Smooth out any wrinkles and ensure that the front and back of the shirt are aligned. This will help you make accurate measurements and cuts.
- Mark the Desired Length: Determine the desired length of your bodysuit. You can refer to your own measurements or try on a bodysuit that fits you well to get an idea of the length you prefer. Use fabric chalk or a washable pen to mark the cutting line on the shirt.
- Check the Fit: Before making any cuts, it’s important to check the fit of the shirt. Put it on and ensure it sits comfortably on your body. Pay attention to the shoulder seams, neckline, and overall fit. If any adjustments are needed, use pins to temporarily secure the fabric in the desired position.
By preparing the shirt properly, you’ll have a solid foundation for transforming it into a bodysuit. Taking accurate measurements and ensuring a good fit at this stage will save you time and prevent any potential mistakes in the later steps. Now that the shirt is ready, let’s move on to the next step: cutting the bottom.
How To Make A Shirt Into A Bodysuit
Step 3: Cut the Bottom
Now that you have prepared the shirt, it’s time to transform the bottom into a bodysuit. Follow these steps to cut the fabric:
- Measure and Mark the Desired Length: Using a measuring tape, determine the length you want for the bodysuit. Measure from the shoulder or neckline down to where you want the bodysuit to end. Mark this length on both sides of the shirt with fabric chalk or a washable pen.
- Carefully Cut Across: Grab a pair of sharp scissors and carefully cut across the bottom of the shirt, following the marked line. Take your time and make sure to cut straight and even. This will determine the overall length of your bodysuit.
- Leave Extra Fabric for Hemming: While cutting, make sure to leave some extra fabric at the bottom. This additional fabric will be used to create a hem later on. It’s better to leave a bit more than you think you’ll need, as you can always make adjustments in the next steps.
By cutting the bottom of the shirt, you are shaping it into a bodysuit that will seamlessly fit your body. Remember to measure and mark accurately, ensuring the desired length for your bodysuit. Now that you have cut the bottom, let’s proceed to the next step: sewing the bottom.
How To Make A Shirt Into A Bodysuit
Step 4: Sew the Bottom
Once you have cut the bottom of the shirt to your desired length, it’s time to sew it to create a clean and polished hem. Follow these steps to sew the bottom:
- Fold Over the Bottom Edge: Take the bottom edge of the fabric and fold it over towards the inside of the shirt. The folded edge should align with the cut edge, creating a clean and finished look.
- Pin the Hem in Place: Use pins to secure the folded fabric in place. Make sure the fabric is smooth and flat, without any wrinkles or creases. This will ensure a neat and professional finish.
- Start Sewing: With a sewing machine or needle and thread, begin sewing the hem along the folded edge. Use a straight stitch or a zigzag stitch, depending on your preference and the fabric of the shirt. Sew all the way around the hem, removing the pins as you go.
- Backstitch at the End: To secure the stitching, backstitch at the end of the hem. This will prevent the thread from unraveling and ensure the durability of your bodysuit.
Sewing the bottom of the shirt will give your bodysuit a finished look and prevent the fabric from fraying. Take your time and sew carefully to ensure a clean and sturdy hem. Now that you have sewn the bottom, let’s move on to the next step: cutting and sewing the sleeves (if desired).
How To Make A Shirt Into A Bodysuit
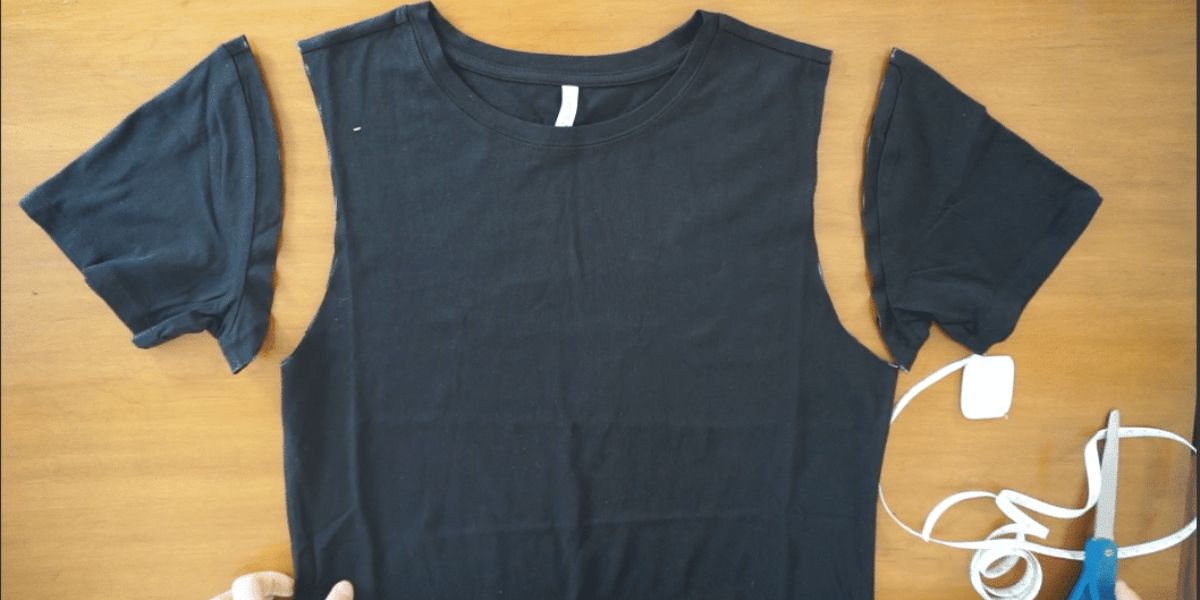
Step 5: Cut and Sew the Sleeves
If you prefer a bodysuit with sleeves, this step will guide you through cutting and sewing them. Follow these steps to add sleeves to your bodysuit:
- Measure and Mark the Sleeve Length: Decide on the desired length for the sleeves. Measure from the shoulder or neckline down to where you want the sleeves to end. Mark this length on both sleeves using fabric chalk or a washable pen.
- Cut Off the Existing Sleeves: Carefully cut off the existing sleeves of the shirt along the marked line. Be precise and follow the line as closely as possible for a clean and even cut.
- Hem the Sleeve Edges: Fold over the cut edge of each sleeve towards the inside of the shirt, creating a hem. Use pins to secure the folded fabric in place, and then sew along the folded edge to secure the hem.
- Attach the New Sleeves: Align the newly hemmed sleeves with the armholes on the shirt. Pin them in place to ensure they are centered and symmetrical. Using a sewing machine or needle and thread, sew the sleeves to the shirt along the armholes. Be careful to sew in a straight line and ensure that the stitches are secure.
Adding sleeves to your bodysuit can provide a different look and add versatility to your wardrobe. Whether you prefer short sleeves, long sleeves, or something in between, this step allows you to customize your bodysuit to suit your personal style. Now that you have cut and sewn the sleeves, let’s move on to the next step: adding snaps or fasteners.
How To Make A Shirt Into A Bodysuit
Step 6: Add Snaps or Fasteners
If you want the convenience of easily opening and closing your bodysuit, consider adding snaps or fasteners to the crotch area. Follow these steps to add snaps or fasteners:
- Choose Your Snaps or Fasteners: Select the type of snap or fastener that you prefer. There are various options available, such as snap buttons, hook and eye closures, or press studs. Make sure to choose a sturdy and secure option that will withstand frequent use.
- Mark the Placement: Determine where you want the snaps or fasteners to be placed. Measure and mark the positions on the inside of the bodysuit to ensure they align properly when closed.
- Attach the Snaps or Fasteners: Following the manufacturer’s instructions, attach the snaps or fasteners to the crotch area of the bodysuit. Use a sewing machine or needle and thread to firmly secure them in place. Ensure that the snaps or fasteners are securely attached and can withstand regular use.
By adding snaps or fasteners, you can easily open and close the crotch area of the bodysuit when needed, providing convenience and practicality. Whether it’s for ease of use or for bathroom breaks, this step allows you to customize your bodysuit to suit your lifestyle and preferences. Now that you have added snaps or fasteners, let’s move on to the final step: testing and adjusting the fit.
How To Make A Shirt Into A Bodysuit
Step 7: Test and Adjust Fit
Now that your bodysuit is almost complete, it’s important to test the fit and make any necessary adjustments. Follow these steps to ensure a comfortable and well-fitting bodysuit:
- Put on the Bodysuit: Step into your newly transformed bodysuit and put it on. Take note of how it feels on your body, paying particular attention to the shoulder, bust, waist, and hip areas.
- Check for Comfort: Move around and perform some basic movements to gauge the comfort level of the bodysuit. Raise your arms, bend over, and sit down to see if there’s any tightness or restriction in movement.
- Make Adjustments: If you find any areas that feel too tight or too loose, use pins to temporarily secure the fabric in the desired position. Make any necessary adjustments to improve the fit and ensure optimal comfort.
- Sew the Adjustments: Once you’re satisfied with the fit, carefully remove the bodysuit and sew the adjustments you made using a sewing machine or needle and thread. Ensure that the stitches are secure and reinforce them if necessary.
Testing and adjusting the fit of your bodysuit is crucial to ensure that it not only looks great but also provides comfort and ease of movement. By customizing the fit to your liking, you can confidently wear your bodysuit knowing that it suits your body shape and personal preferences. Congratulations! You have successfully transformed a shirt into a stylish and unique bodysuit.
Conclusion
Transforming a regular shirt into a fashionable bodysuit is not only a creative and enjoyable DIY project, but it also allows you to give new life to old or unused clothing items. By following the step-by-step guide outlined in this article, you can easily create a bodysuit that perfectly fits your body shape and showcases your personal style.
Throughout the process, you learned how to prepare the shirt, cut and sew the bottom and sleeves, add snaps or fasteners for convenience, and test and adjust the fit to ensure a comfortable and flattering outcome. Each step was designed to guide you through the process and help you achieve a professional-looking bodysuit.
Not only does creating a bodysuit from a shirt provide a sustainable way of upcycling your wardrobe, but it also gives you the opportunity to express your creativity and individuality. You can experiment with different fabric patterns, colors, and sleeve lengths to create a bodysuit that is truly unique to you.
Once your bodysuit is complete, you’ll have a versatile and stylish piece of clothing that can be dressed up or down for any occasion. Whether you pair it with jeans for a casual look or wear it with a skirt for a more dressy ensemble, your bodysuit will add a touch of trendy elegance to your outfit.
Remember to take your time, follow the steps carefully, and make adjustments as needed to ensure the best possible fit and finish. With a little creativity and effort, you can transform a simple shirt into a standout bodysuit that will turn heads and make you feel confident and stylish.
So why not unleash your inner fashion designer and give it a go? Get ready to show off your unique sense of style with a custom-made bodysuit that is sure to make a fashion statement!