Home>How-to Guides>For All>How To Make A Simple Jedi Robe
For All
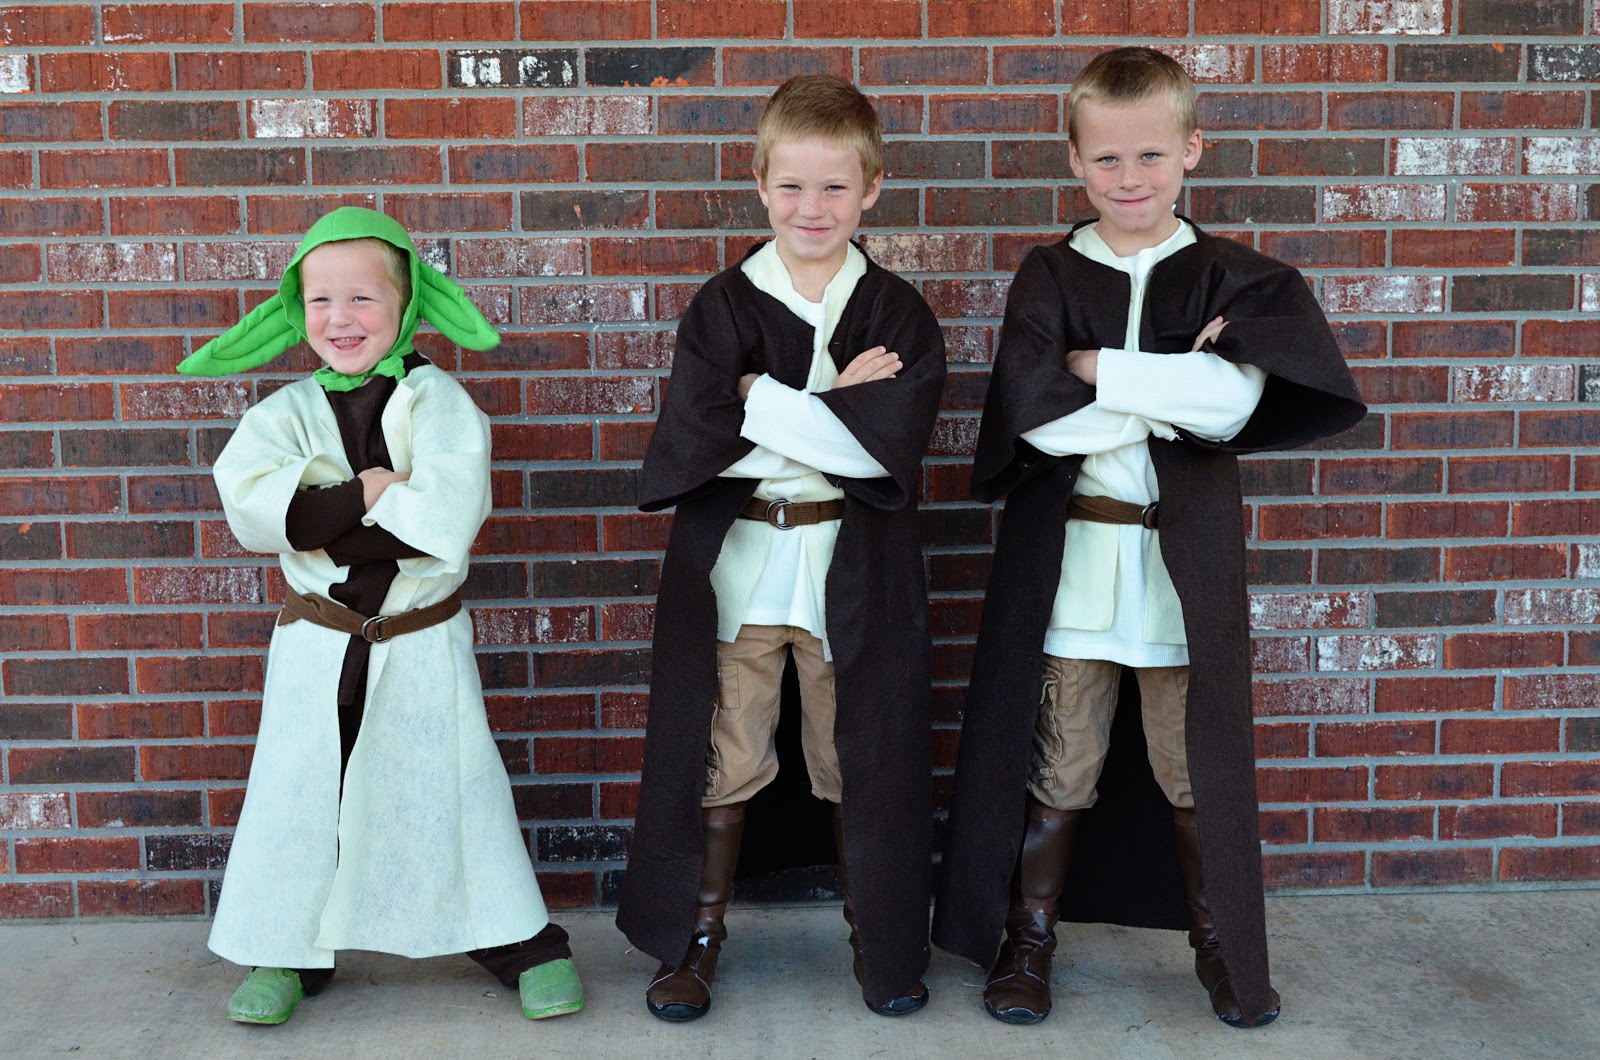
How To Make A Simple Jedi Robe
Modified: July 30, 2023
Learn how to easily create a Jedi robe for all aspiring Star Wars fans. Follow our step-by-step guide and unleash your inner Jedi!
(Many of the links in this article redirect to a specific reviewed product. Your purchase of these products through affiliate links helps to generate commission for Under-tec.com, at no extra cost. Learn more)
Table of Contents
Introduction
Are you a fan of the legendary Jedi knights from the Star Wars universe? Do you want to channel your inner Jedi and make your own Jedi robe? Look no further, as we guide you through the process of creating a simple Jedi robe that will make you feel like a true master of the Force.
Whether you’re planning to attend a cosplay event, participate in a Star Wars-themed party, or simply want to add a touch of Jedi mystique to your wardrobe, making your own Jedi robe is a fun and rewarding project. Not only will you have a unique costume piece, but you’ll also have the satisfaction of creating it yourself.
In this step-by-step guide, we’ll walk you through the process of making a simple Jedi robe. We’ll cover everything from choosing the right fabric and taking measurements, to cutting and sewing the robe, and adding the finishing touches for that authentic Jedi look. So, let’s dive in and get started on our Jedi robe creation journey!
Materials Needed
Before you embark on your Jedi robe making adventure, it’s important to gather all the necessary materials. Here’s a list of what you’ll need:
- Fabric: Choose a fabric that is lightweight, breathable, and comfortable to wear. Ideally, opt for natural fibers such as cotton or linen. The amount of fabric needed will depend on your measurements, so make sure to take accurate measurements before purchasing.
- Measuring tape: A measuring tape is essential to ensure accurate measurements for your robe.
- Scissors: Invest in a good pair of fabric scissors to cut the fabric cleanly and precisely.
- Sewing machine or needle and thread: Depending on your sewing skills and preference, you can either use a sewing machine or sew by hand with a needle and thread.
- Pins: Pins will help in securing the fabric in place as you cut and sew.
- Iron: An iron will come in handy to press and flatten the fabric for neat seams and hems.
- Pattern or template: While not necessary, a pattern or template can simplify the process by providing guidance for cutting and sewing the robe.
- Optional accessories: If you want to add some extra flair to your Jedi robe, you can consider adding a belt or robe fasteners.
Once you have gathered all the materials, you’ll be well-equipped to start creating your very own Jedi robe. Make sure you have a comfortable and well-lit workspace, as this will make the sewing process much more enjoyable.
Step 1: Choosing the Fabric
When it comes to making a Jedi robe, the choice of fabric is crucial. You want a fabric that not only looks the part but also feels comfortable and allows for ease of movement. Here are some points to consider when selecting your fabric:
- Weight and drape: Opt for a lightweight fabric that drapes well. Heavy fabrics may make the robe appear bulky and restrict your movements, which is not ideal for a Jedi robe.
- Breathability: Since you’ll be wearing the robe for extended periods, especially if you’re attending a convention or event, choose a fabric that is breathable to prevent discomfort and overheating.
- Texture: Consider the texture of the fabric. Jedi robes typically have a slightly rough or textured appearance. Fabrics like cotton or linen can add authenticity to your robe.
- Color: The color of your fabric will depend on the type of Jedi you want to portray. Traditionally, Jedi robes are seen in shades of brown and earth tones, but feel free to get creative and choose a color that resonates with you.
- Availability and cost: Make sure to consider the availability and cost of the fabric. You want to choose something within your budget and easily accessible in your area.
Once you have these factors in mind, head to your local fabric store or browse online to find the perfect fabric for your Jedi robe. Don’t be afraid to ask for assistance from the store staff if you need help in selecting the right fabric.
Remember, the fabric you choose will greatly impact the overall look and feel of your Jedi robe, so take your time in making this decision. With the right fabric in hand, you’ll be one step closer to creating your very own Jedi masterpiece.
Step 2: Taking Measurements
Before you begin cutting and sewing your Jedi robe, it’s essential to take accurate measurements to ensure a proper fit. Here’s a step-by-step guide on how to take measurements for your Jedi robe:
- Shoulder Width: Measure from shoulder to shoulder across your upper back. This will determine the width of the robe’s shoulders.
- Chest: Measure around the fullest part of your chest. Make sure to keep the tape measure snug but not too tight.
- Waist: Measure around your natural waistline, which is typically above your belly button and below your rib cage.
- Hip: Measure around the fullest part of your hips. This measurement is important to ensure ease of movement.
- Sleeve Length: Determine how long you want the sleeves to be by measuring from your shoulder down to your desired sleeve length. For a traditional Jedi robe, the sleeves usually extend to the wrist.
- Robe Length: Measure from the base of your neck to your desired robe length. This will determine how long the robe will be on your body.
It’s always a good idea to have someone assist you with taking these measurements to ensure accuracy. Stand up straight with your arms relaxed by your sides while being measured, as this will give you the most accurate results.
Once you have your measurements, add a few inches of ease to allow for comfortable movement. This will ensure that the robe is not too tight or restrictive.
Keep these measurements handy as you proceed to the next steps of cutting and sewing your Jedi robe. Taking the time to obtain accurate measurements will result in a well-fitted and comfortable garment.
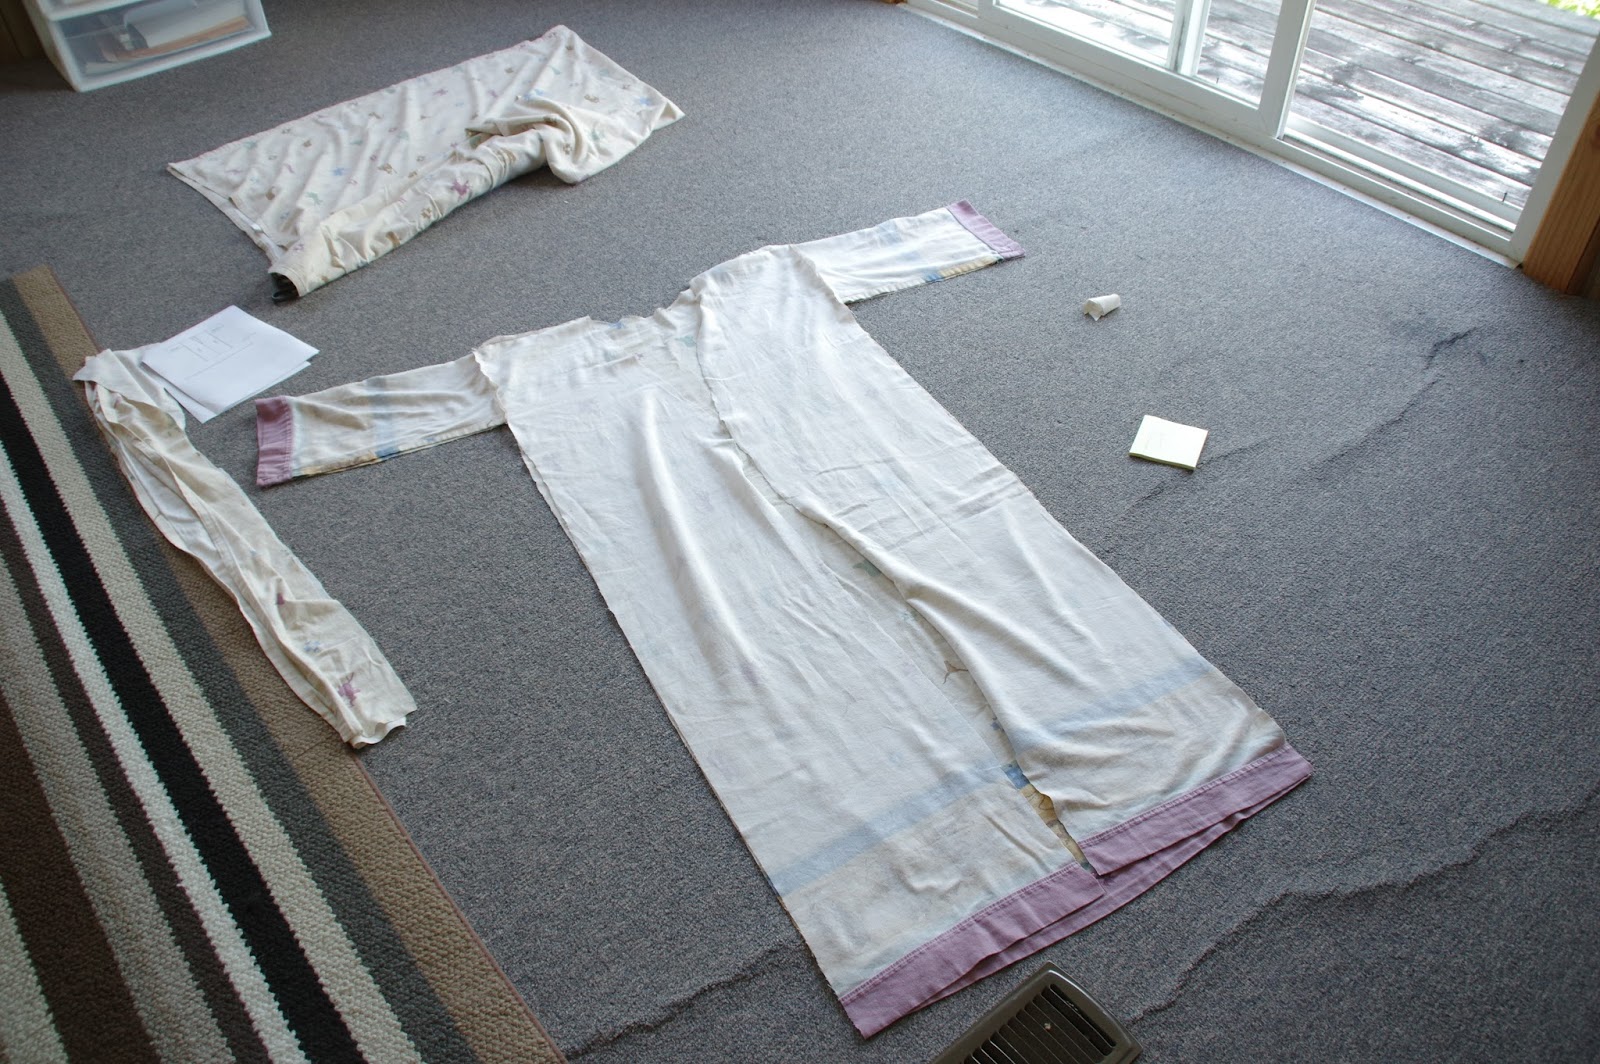
Step 3: Cutting the Fabric
With your measurements in hand, it’s time to move on to cutting the fabric for your Jedi robe. Follow these steps to ensure precise cuts:
- Prepare your workspace: Clear a large, flat surface where you can lay out your fabric. Make sure it’s clean and free of any debris.
- Wash and iron the fabric: If necessary, wash and iron the fabric before cutting. This will help remove any wrinkles and ensure accurate measurements.
- Mark and measure: Using a fabric marker or chalk, mark the measurements onto the fabric. Use a straightedge or ruler to create straight lines.
- Shoulders and neckline: Start by cutting the shoulders and neckline of the robe. Follow the measurements you took previously, accounting for seam allowances as you go.
- Body and sleeves: Next, cut the main body of the robe. The width should be based on your chest measurement, and the length should match your desired robe length. Cut the sleeves according to your sleeve length measurement.
- Optional details: If you want to add additional elements to your Jedi robe, such as a hood or decorative panels, now is the time to cut those pieces as well.
When cutting the fabric, it’s important to cut with clean, sharp scissors in smooth, even motions. Take your time and double-check your measurements and markings to ensure accuracy.
Remember to leave seam allowances around the edges of your fabric pieces. This will give you room to sew the pieces together and ensure a clean finished result.
Once you’ve successfully cut all the fabric pieces for your Jedi robe, you’re ready to move on to the exciting part – sewing it all together!
Step 4: Sewing the Robe
Now that you have your fabric pieces cut to size, it’s time to sew your Jedi robe together. Follow these steps to bring your robe to life:
- Prepare your sewing machine: If you’re using a sewing machine, ensure that it is threaded and ready for use. If you’re sewing by hand, thread your needle and knot the end of the thread.
- Shoulders and neckline: Start by sewing the shoulder seams together, matching the front and back pieces of the robe. Use a straight stitch with a ½ inch seam allowance. Next, sew the neckline, making sure to sew along the marked lines.
- Sleeves: Attach the sleeves to the robe by matching the seams and pinning them together. Sew along the sleeve edges, attaching them to the main body of the robe. Repeat this step for the other sleeve.
- Side seams: Fold the robe in half, right sides together, and match the side seams. Pin them in place and sew along the edges, starting from the bottom of the robe and ending at the bottom of the sleeves.
- Optional details: If you have any optional details like a hood or decorative panels, now is the time to attach them. Follow the pattern or instructions you have, or use your creativity to sew them onto the robe.
- Hemming: Finally, hem the bottom of the robe, the sleeve cuffs, and any other visible raw edges. Fold the edges in by about half an inch and sew along the folded edge to create a neat hem.
As you sew, make sure to backstitch at the beginning and end of each seam to reinforce the stitches. This will prevent the seams from unraveling over time.
If you’re sewing by hand, use a backstitch or running stitch for secure seams. Take your time and sew with even and consistent stitches for a professional finish.
Once you’ve completed all the necessary sewing, give your Jedi robe a final press with an iron to remove any wrinkles and ensure it looks its best.
And just like that, your Jedi robe is sewn and ready to be worn! Now, it’s time to add those finishing touches to truly embody the Jedi aesthetic.
Step 5: Adding Finishing Touches
With your Jedi robe nearly complete, it’s time to add those final touches that will truly bring it to life. Here are a few ideas to enhance the authenticity and personalization of your robe:
- Belt: Adding a belt can give your Jedi robe a more polished and stylish look. Choose a belt that matches the color scheme of your robe or opt for a simple leather or fabric belt to cinch the waist.
- Robe fasteners: If you want to secure your robe and prevent it from billowing open, consider adding robe fasteners. These can be fabric ties, buttons, or even decorative clasps that add a touch of elegance to your Jedi ensemble.
- Decorative elements: To further personalize your Jedi robe, consider adding small decorative elements. For example, you could attach patches or embroider symbols that represent your Jedi persona or beliefs.
- Weathering and distressing: If you want to achieve a more weathered and battle-worn appearance, you can distress your robe by lightly sanding or washing it to create a worn-in effect. This adds depth and character to your costume.
- Accessories: Complete your Jedi look with the right accessories. Adding a lightsaber, Jedi boots or sandals, and a robe hood can make your ensemble even more convincing.
Remember, these finishing touches are optional and should reflect your personal style and interpretation of a Jedi. Get creative and experiment to make your Jedi robe truly unique and customized to your taste.
Once you’ve added all the finishing touches, try on your Jedi robe and admire your handiwork. You’ve successfully crafted your own Jedi robe, ready to embark on adventures, attend events, or simply enjoy the thrill of channeling the Force.
May the Force be with you!
Conclusion
Congratulations on completing your journey to make a simple Jedi robe! By following these steps, you have created a unique and authentic garment that will allow you to channel your inner Jedi.
From choosing the right fabric, taking accurate measurements, and cutting and sewing the pieces together, to adding the finishing touches, you have brought your Jedi robe to life. Whether you plan to wear it to cosplay events, parties, or simply as a fun addition to your wardrobe, your custom-made Jedi robe is a testament to your creativity and passion for the Star Wars universe.
Remember, making a Jedi robe is just the beginning. You can continue to refine and personalize your robe, adding new elements or experimenting with different fabrics and designs. Let your imagination soar and embrace the Force within you.
Now, it’s time to step into the shoes of a true Jedi, feel the flow of the fabric, and let the world see your Jedi prowess. May your Jedi robe serve as a symbol of your dedication and love for the Star Wars universe.
May you embark on countless adventures, inspire those around you, and always remember the wise words of Master Yoda, “Do or do not, there is no try.”
May the Force be with you!