Home>How-to Guides>For Women>How To Sew Bra Cup
For Women
How To Sew Bra Cup
Modified: August 2, 2023
Learn how to sew bra cups for women with this easy step-by-step guide. Enhance your sewing skills and create custom-fit bras.
(Many of the links in this article redirect to a specific reviewed product. Your purchase of these products through affiliate links helps to generate commission for Under-tec.com, at no extra cost. Learn more)
Table of Contents
Introduction
Welcome to our comprehensive guide on how to sew bra cups! Whether you’re a seasoned seamstress or a beginner looking to expand your skills, mastering the art of sewing bra cups is an essential technique to have in your repertoire. Sewing your own bra cups allows you to customize the fit and comfort of your undergarments, ensuring that they perfectly suit your individual needs and preferences.
Are you tired of ill-fitting bras that dig into your skin or fail to provide the necessary support? By sewing your own bra cups, you can say goodbye to these issues and hello to a perfectly fitting, supportive, and comfortable lingerie.
Don’t worry if you’re new to sewing or have never ventured into the world of lingerie making before. In this guide, we will break down the process of sewing bra cups into simple and easy-to-follow steps. From taking accurate measurements to attaching the cups to your bra, we will walk you through each stage of the process, ensuring that you can create professional-looking bra cups at home.
But before we dive into the nitty-gritty of sewing bra cups, let’s take a quick look at the materials you will need for this project. Having the right tools and supplies on hand will make the entire process much smoother and more successful, so let’s get started!
Materials Needed
Before you begin sewing your own bra cups, it’s important to gather all the necessary materials. Having the right tools and supplies will ensure that your project goes smoothly and yields professional results. Here’s a list of what you’ll need:
- Fabric: Choose a fabric that is suitable for lingerie and provides the desired level of support and comfort. Look for stretch fabrics such as spandex or lycra blends.
- Lining Fabric: Lining fabric is used to provide structure and stability to the bra cups. Opt for lightweight, non-stretch fabrics like cotton or nylon.
- Bra Cup Padding: Depending on your preference, you may want to add foam or fabric padding to enhance the shape and support of your bra cups.
- Bra Underwire: If you prefer an underwired bra, you’ll need underwire casings and appropriate-sized underwires
- Elastic: Elastic is used to create the band and straps of the bra. Choose high-quality elastic that is comfortable against the skin and provides adequate support.
- Thread: Select a thread that matches the color of your fabric and is suitable for sewing stretch fabrics. Polyester thread or nylon thread works well for bra-making projects.
- Needles: Use ballpoint or stretch needles designed for sewing with knit fabrics. These needles will prevent damage to the fabric and ensure smooth stitching.
- Scissors: Invest in a sharp pair of fabric scissors for cutting your fabrics accurately and cleanly.
- Pins or Clips: Pins or clips are essential for holding your fabric layers together during sewing. Use stainless steel pins or sewing clips to avoid rusting.
- Measuring Tape: A flexible measuring tape is crucial for taking accurate measurements of your bust, underbust, and other areas for a precise fit.
- Sewing Machine: Having a reliable sewing machine that can handle stretch fabrics is essential for sewing bra cups. Make sure your machine is in good working condition.
- Iron: An iron and ironing board are necessary for pressing your fabric and achieving neat, professional-looking seams.
With these materials on hand, you’re ready to embark on your bra cup sewing journey. Now that you’re well-prepared, let’s move on to the first step: taking accurate measurements.
Step 1: Taking Measurements
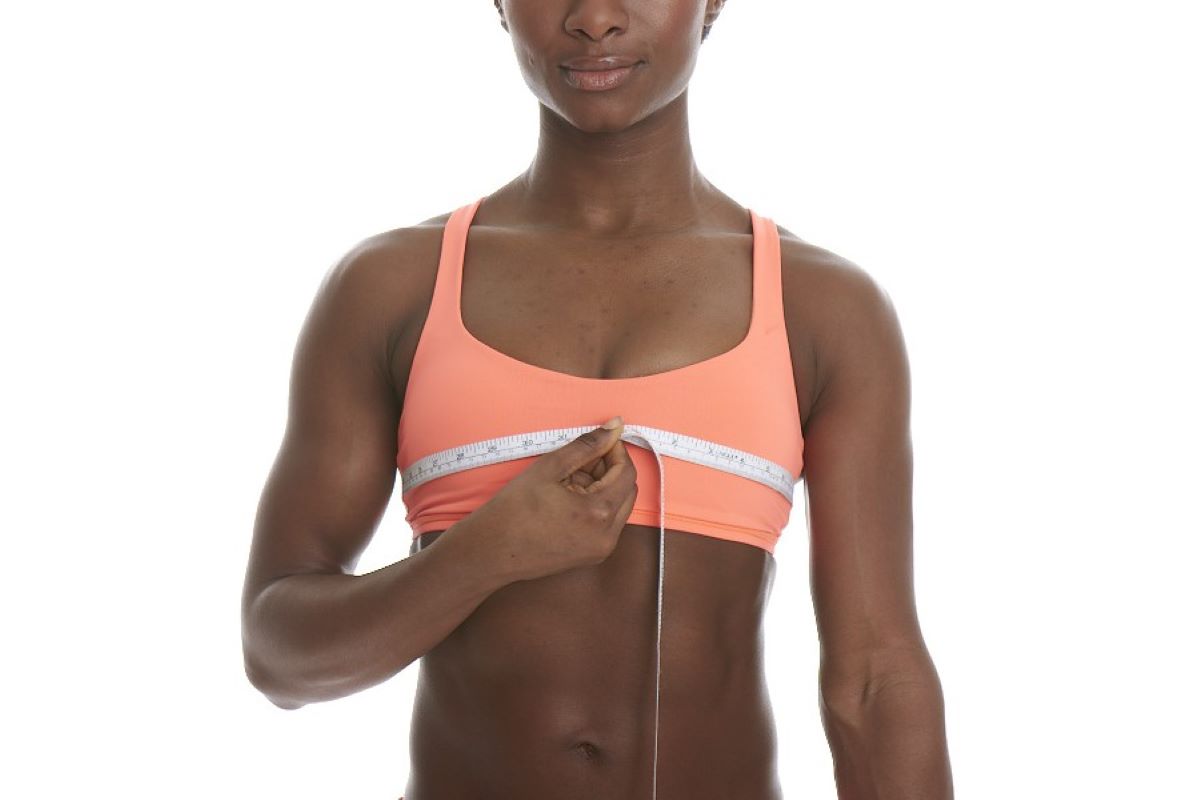
Before you start sewing your bra cups, it’s crucial to take accurate measurements to ensure a perfect fit. Here’s a step-by-step guide on how to take the necessary measurements:
- Bust Measurement: Using a flexible measuring tape, wrap it around the fullest part of your bust. Ensure that the tape is parallel to the ground and not too tight or too loose.
- Underbust Measurement: Measure around your ribcage, just below your breasts. Again, make sure the measuring tape is snug but not too tight.
- Bra Band Size: Subtract your underbust measurement from your bust measurement to determine your bra band size. Consult a bra size chart to find your corresponding band size.
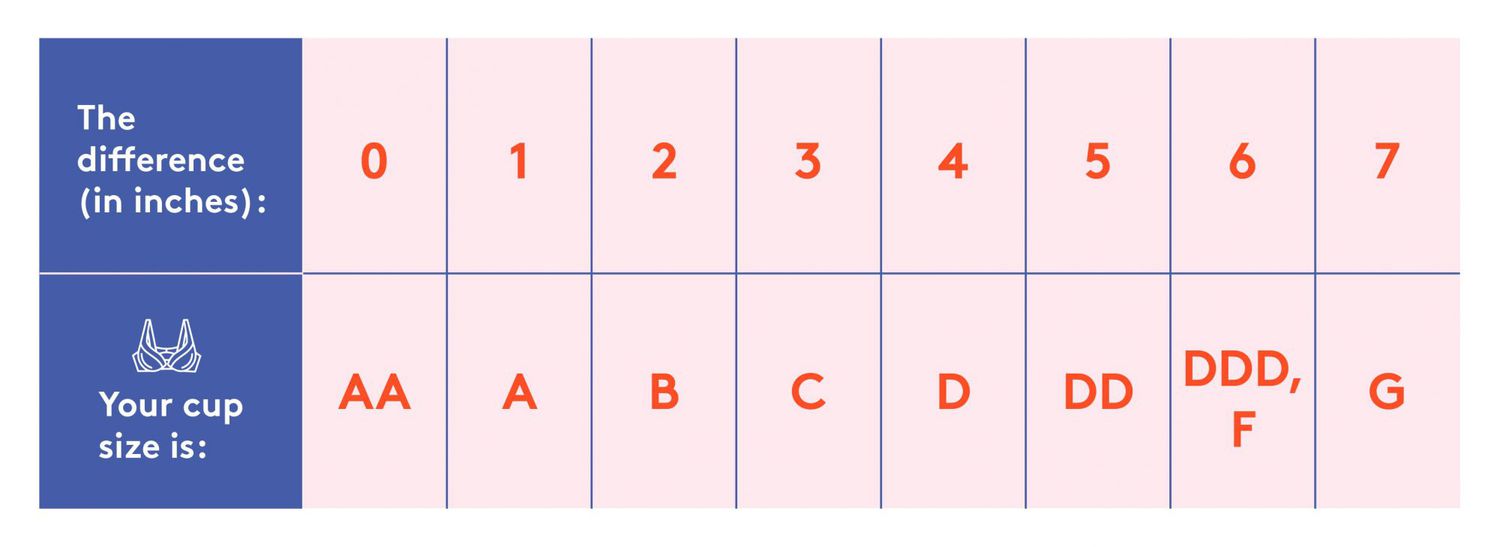
- Cup Size: Subtract your underbust measurement from your bust measurement. Use the difference to find your cup size in relation to your band size. For example, a difference of 1 inch corresponds to an A cup, 2 inches to a B cup, and so on.
- Additional Measurements: Depending on the bra style you want to create, you may need additional measurements, such as the length of the underwire casing or the strap length. Refer to your chosen bra pattern or tutorial for specific measurements.
Taking accurate measurements is crucial to ensuring a well-fitting and comfortable bra. Remember to measure yourself while wearing a well-fitting bra or no bra at all for the most precise results.
Once you have your measurements, you can move on to preparing the pattern for your bra cups. In the next step, we will guide you through this process to ensure your pattern fits perfectly to your measurements.
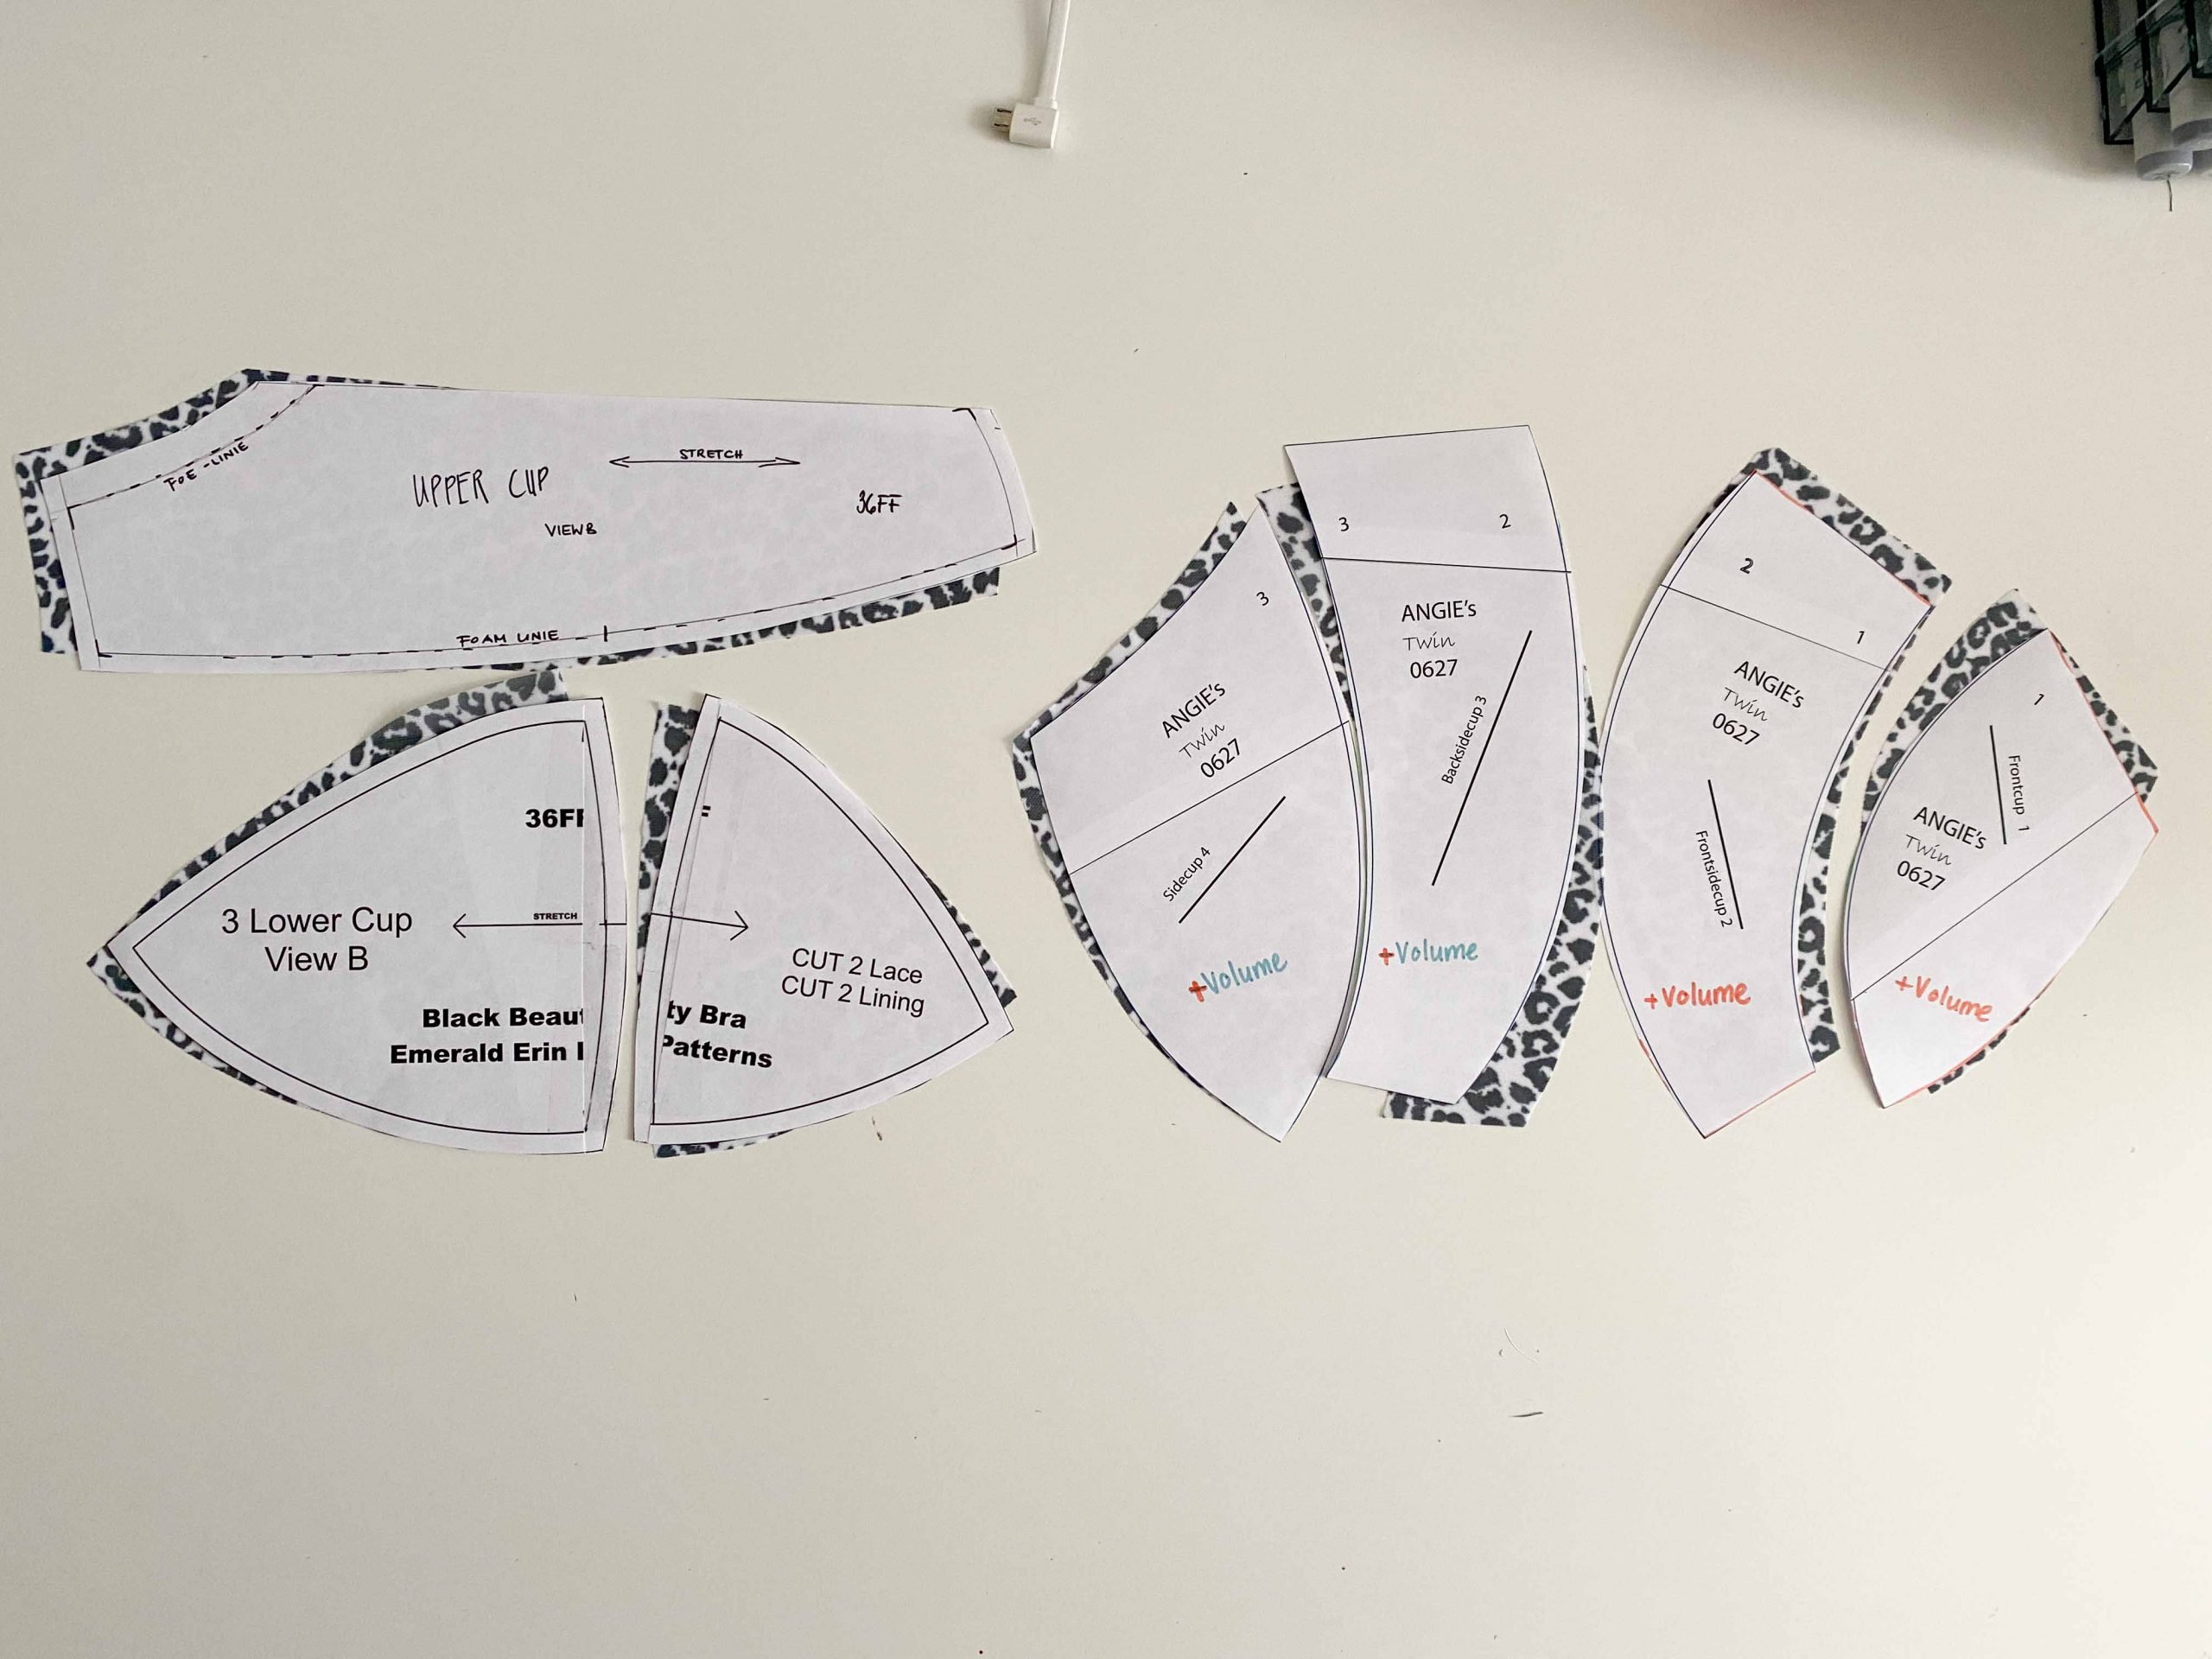
Step 2: Preparing the Pattern
Now that you have your measurements, it’s time to prepare the pattern for your bra cups. Whether you’re using a commercial pattern or drafting your own, this step is crucial for achieving a precise fit. Follow these steps to prepare the pattern:
- Choose a Pattern: There are several options available for bra cup patterns. You can purchase a commercial pattern specific to your size and style preference or create your own by tracing an existing bra that fits you well.
- Trace the Pattern: If you’re using a commercial pattern, carefully trace the pattern pieces onto tracing paper or pattern paper. Be sure to transfer all relevant markings, such as notches and grain lines.
- Adjust the Pattern: Compare the pattern to your measurements and make any necessary adjustments. This may involve grading between sizes, adding or subtracting length, or making other modifications to ensure a perfect fit.
- Cut Out the Pattern: Once you’re satisfied with the adjustments, cut out the pattern pieces along the appropriate size lines. Use sharp fabric scissors for clean, accurate cuts.
It’s important to note that preparing the pattern is a vital step in achieving a well-fitting bra. Take your time to ensure accuracy and double-check your measurements before cutting out the fabric.
Now that you have your pattern ready, it’s time to move on to the next step: cutting the fabric for your bra cups. In the following section, we will guide you through the process to help you achieve precise and professional-looking fabric cuts.
Step 3: Cutting the Fabric
With your pattern prepared, it’s time to cut the fabric for your bra cups. Proper fabric cutting is essential to achieve precise and professional-looking results. Follow these steps to cut the fabric:
- Prepare the Fabric: Start by preparing your fabric. If necessary, prewash and iron your fabric according to its care instructions. This will prevent any potential shrinkage or distortion after sewing.
- Pin the Pattern: Lay your fabric on a clean, flat surface. Place the pattern pieces onto the fabric, aligning them with the grainline and following the pattern layout indicated in the instructions. Pin the pattern pieces to the fabric to secure them in place.
- Trace and Cut: Using a fabric marker or tailor’s chalk, trace around the pattern pieces onto the fabric. Be sure to transfer any necessary markings, such as notches and pleat lines. Once traced, remove the pattern pieces and set them aside. Use fabric scissors to cut along the traced lines, ensuring clean and accurate cuts.
- Repeat for Lining and Padding: If you are using lining fabric or adding padding to your bra cups, repeat the tracing and cutting process for these additional layers. The lining fabric should be cut following the same pattern pieces as the main fabric.
When cutting the fabric, it’s important to pay attention to the fabric’s grainline and ensure that it aligns with the pattern grainline. This will prevent any distortion or twisting of the fabric once the bra cups are assembled.
Once you have cut all the necessary fabric pieces, it’s time to start sewing the bra cups. In the next section, we will guide you through the process of stitching the cups together to create the foundation for your bra.
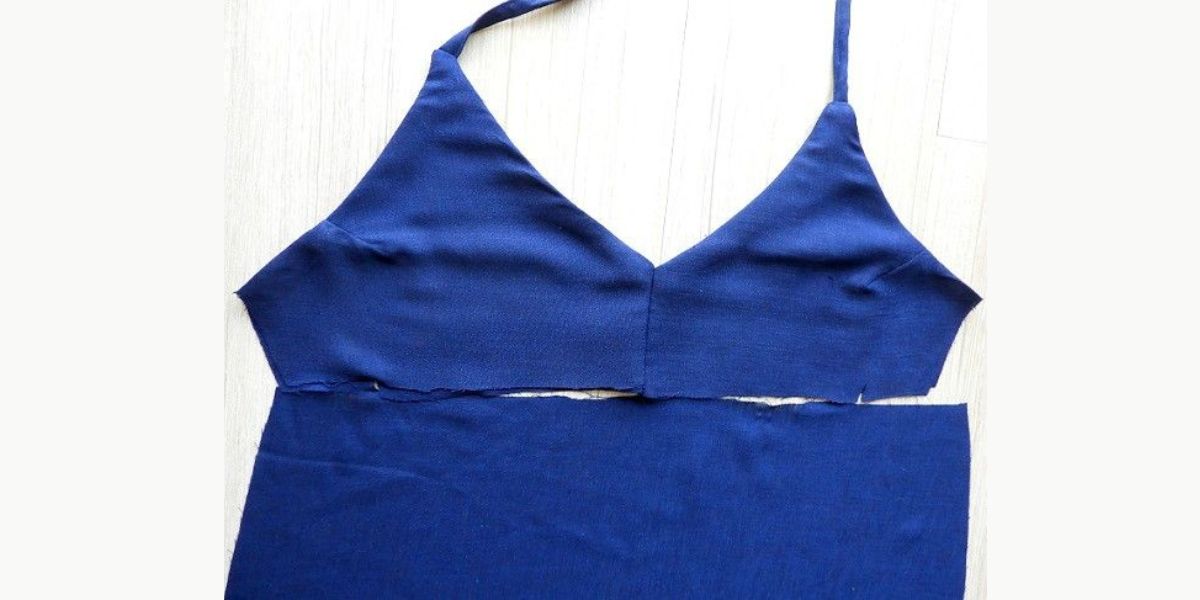
Step 4: Sewing the Cups
Now that you have cut out the fabric pieces for your bra cups, it’s time to sew them together. This step involves assembling the main fabric and lining fabric to create the structure and shape of the cups. Follow these steps to sew the cups:
- Pin the Pieces: Lay the main fabric cup piece and the lining cup piece together, right sides facing each other. Pin around the edges to align the pieces and keep them in place during sewing.
- Stitch the Seam: Using a stretch stitch or a narrow zigzag stitch, sew along the curved edge of the cup. Backstitch at the beginning and end of the seam to secure it. This stitching will join the cup pieces together.
- Grade the Seam: Trim the seam allowance down to reduce bulk and create a smoother finish. Be careful not to cut into the stitching. You can also use pinking shears to trim the seam allowance for added ease.
- Press the Seam: Open up the cup and press the seam flat with an iron. This will help to set the seam and create a clean, professional appearance.
- Repeat for Other Cup Pieces: Repeat the above steps for the remaining cup pieces, sewing the main fabric and lining fabric together for each cup shape.
Remember to take your time and sew with precision to ensure that the cup pieces line up without any distortion or puckering. It’s also helpful to test the fit of the cups on yourself or a dress form as you sew to make any necessary adjustments.
With the cups sewn together, you’re one step closer to having your own handmade bra. In the next section, we will guide you through the process of attaching the cups to the bra band for a complete and functional undergarment.
Step 5: Attaching the Cups to the Bra
Now that you have the bra cups sewn and ready, it’s time to attach them to the bra band. This step will bring your bra to life and provide the necessary support and structure. Follow these steps to attach the cups:
- Prepare the Bra Band: If you’re using a premade bra band, make sure it is properly sized and adjusted to fit your measurements. If you’re sewing your own bra band, follow the pattern instructions to create a customized band to match your cup size.
- Mark the Placement: Place the bra band right side up and position the cups on top, centered on the band. Use pins or tailor’s chalk to mark the placement of the cups on the band. Ensure that the cups are evenly positioned and aligned with your breast apex.
- Stitch the Cups to the Band: Using a zigzag stitch or a stretch stitch, sew along the marked lines to attach the cups to the band. Start stitching from one side and continue all the way around to the other side. This stitching will securely join the cups to the band.
- Adjust and Test the Fit: Once the cups are attached, try on the bra to check the fit and make any necessary adjustments. Ensure that the cups sit smoothly against your breasts and provide the desired support. You can make minor alterations at this stage, such as reshaping the cups or adjusting the band tension.
Take your time with this step to ensure that the cups are securely attached and aligned properly on the bra band. Adjustments can be made as needed to achieve the perfect fit and comfort.
With the cups now attached to the bra band, you’re almost done! In the final step, we will guide you through adding the finishing touches to complete your handmade bra.
Step 6: Finishing Touches
Congratulations! You’re in the final step of creating your own handmade bra. This step involves adding the finishing touches to complete your bra and give it a polished, professional look. Follow these steps to perfect your bra:
- Elastic Application: Measure and cut the appropriate length of elastic for the band and straps of your bra. Attach the elastic to the corresponding edges, making sure to stretch it slightly as you sew to provide a snug and secure fit.
- Underwire Casing (Optional): If you prefer an underwired bra, now is the time to insert the casing and underwire. Follow the instructions provided with your pattern or tutorial to sew the casing and insert the underwire into the cups.
- Strap Attachment: Attach the bra straps to the cups and band according to your desired style and functionality. You can use sliders and rings to adjust the length of the straps for a customized fit.
- Final Fitting: Once all the finishing touches are completed, try on your bra to ensure that everything fits and feels comfortable. Make any last-minute adjustments if necessary, such as tightening or loosening the straps.
- Final Stitching and Trim: Carefully examine the entire bra for any loose threads or unfinished edges. Trim any excess threads and make any final stitching adjustments to ensure the longevity and durability of your bra.
Remember to sew with precision and pay attention to detail in this final stage. Taking the time to complete these finishing touches will elevate the overall look and functionality of your handmade bra.
Once you’re satisfied with the fit and appearance of your bra, you can give it a final press with an iron to smooth out any wrinkles and make it truly picture-perfect.
Congratulations! You have successfully sewn your own bra cups and completed your handmade bra. Take a moment to admire your creation and revel in the accomplishment of making a custom piece of lingerie. Now, go ahead and rock your new bra with confidence!
Conclusion
Congratulations on completing your journey of sewing bra cups! By following the step-by-step guide outlined in this article, you have learned the essential techniques needed to create your own customized and perfectly fitting bra. Sewing your own bra cups allows you to unleash your creativity, achieve a personalized fit, and enjoy the satisfaction of wearing a handmade undergarment.
Throughout the process, we discussed the importance of taking accurate measurements, preparing the pattern, cutting the fabric, sewing the cups, attaching them to the bra band, and adding the finishing touches. Each step contributes to the overall success of your handmade bra, ensuring that it looks and feels great.
Now that you have the knowledge and skills, feel free to experiment with different fabrics, styles, and designs to create a bra wardrobe that suits your unique preferences. Don’t hesitate to try out new techniques or incorporate embellishments to add your personal touch.
Remember, sewing bra cups can be a challenging task, especially for newcomers. It may take some practice to perfect your technique and achieve the desired results. Don’t be disheartened if your first attempt isn’t flawless. Keep practicing, learning, and refining your skills. With time and dedication, you will become more confident and skilled in the art of sewing bra cups.
So go ahead, embrace your creativity, and enjoy the process of sewing your own bra cups. Not only will you have a functional and fitting undergarment, but you’ll also have the satisfaction of knowing that you created it yourself. Happy sewing!