Home>How-to Guides>For Women>How To Turn A Tank Top Into A Skirt
For Women
How To Turn A Tank Top Into A Skirt
Modified: July 30, 2023
Learn how to transform a tank top into a stylish skirt for women, adding versatility to your wardrobe and creating a unique fashion statement.
(Many of the links in this article redirect to a specific reviewed product. Your purchase of these products through affiliate links helps to generate commission for Under-tec.com, at no extra cost. Learn more)
Table of Contents
Introduction
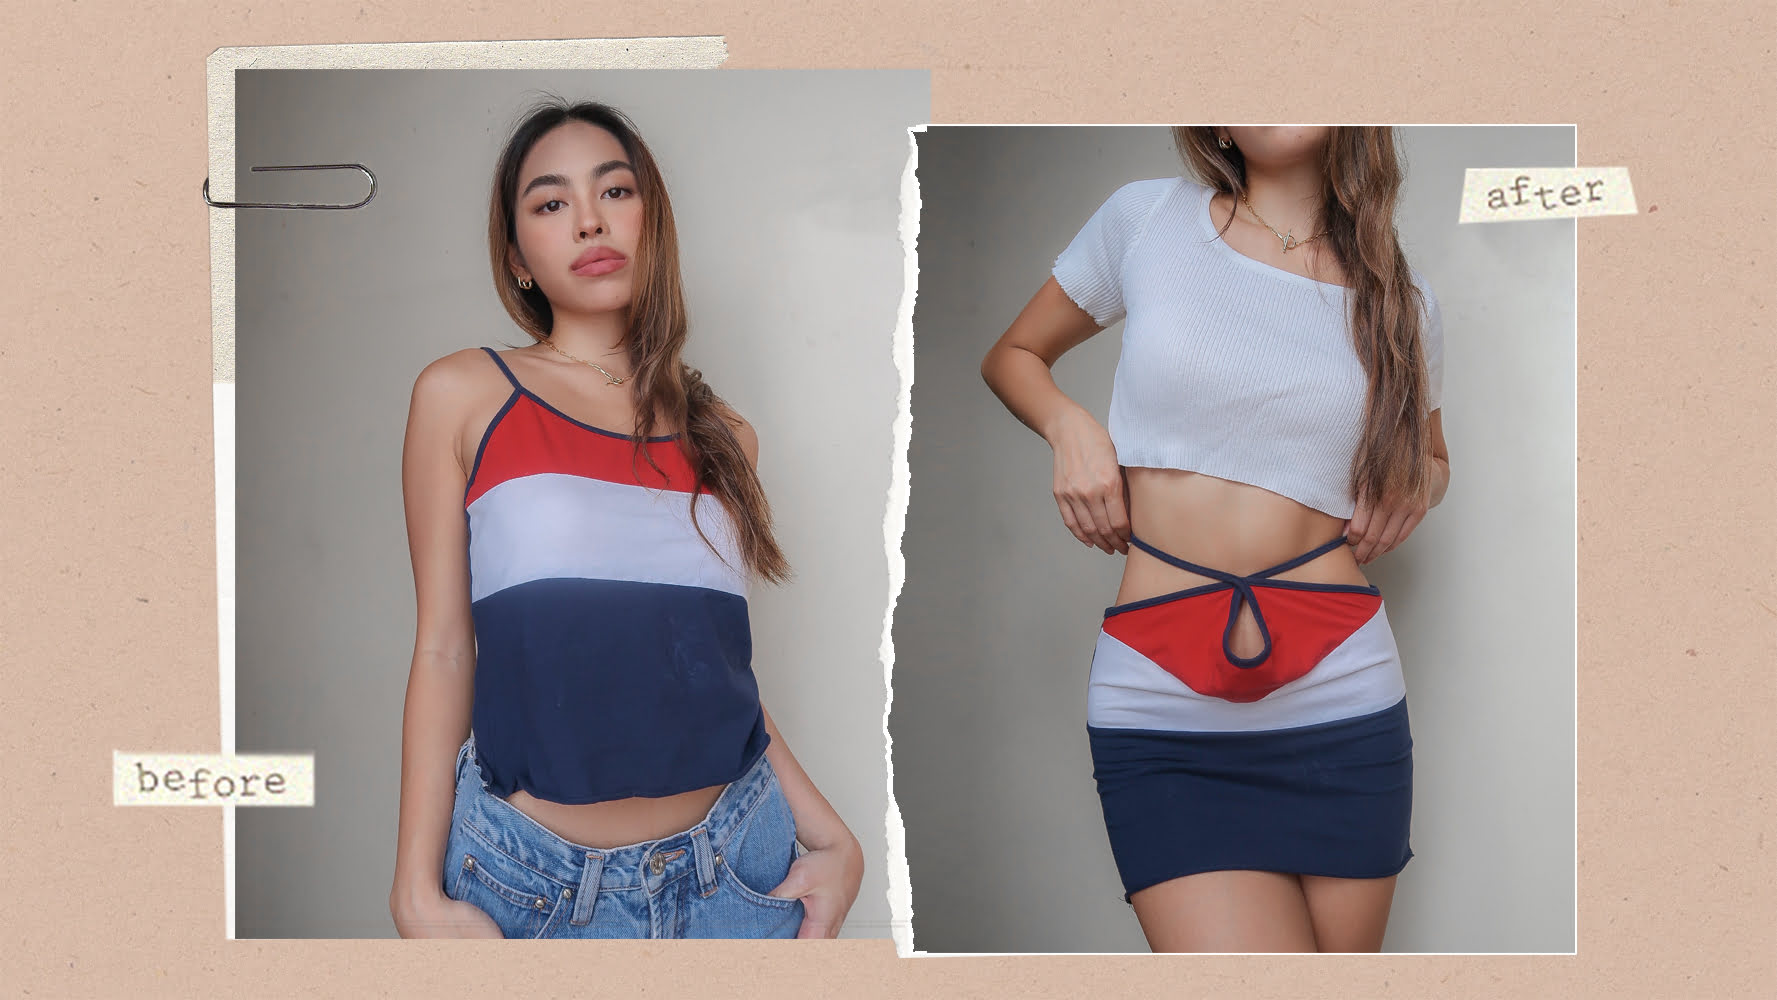
Welcome to this DIY fashion tutorial on how to transform a tank top into a stylish and trendy skirt! Upcycling your old clothing not only helps you save money, but it also gives you the opportunity to unleash your creativity and create unique pieces to add to your wardrobe.
Turning a tank top into a skirt is a fun and easy project that anyone can do, regardless of sewing skills. It’s a great way to repurpose a tank top that you no longer wear or a vintage find that needs a modern twist.
In this step-by-step guide, we will walk you through the process of transforming your tank top into a fashionable skirt. You will need a few basic materials, a little bit of time, and a dash of creativity to complete this project.
Whether you’re looking to revamp your style, save money on new clothing, or simply enjoy a fun DIY project, this tutorial has got you covered. So, gather your supplies and let’s get started on turning your tank top into a fabulous skirt!
Materials Needed
Before we begin, let’s gather the materials you’ll need for this DIY project:
- A tank top – Choose one that fits you well and is made of a stretchy fabric for better comfort.
- Fabric scissors – Make sure you have a sharp pair of fabric scissors for clean and precise cuts.
- Elastic band – This will be used to create the waistband of your skirt. Choose a band that is wide enough to provide a comfortable fit.
- Sewing pins – These will come in handy for holding the fabric layers together as you work.
- Sewing machine or needle and thread – You’ll need these to secure the elastic and hem the skirt. A sewing machine will make the process faster, but hand stitching can achieve the same results.
- Measuring tape – This will help you determine the length of your skirt and the placement of the waistband.
- Optional: Decorative trims or embellishments – If you want to add a personal touch to your skirt, consider adding trims or embellishments such as lace, beads, or ribbons.
Make sure you have all the materials listed above before starting your tank top to skirt transformation. Having everything prepared will ensure a smooth and efficient process.
Step 1: Gather Supplies
Before diving into the transformation process, it’s important to gather all the necessary supplies. This will ensure a smooth and uninterrupted workflow. Here’s what you need to do:
- Find a clean and flat working surface – It’s essential to have a clear area where you can comfortably spread out your materials and work on your tank top to skirt conversion.
- Lay out your tank top – Smooth out your tank top on the working surface, ensuring there are no wrinkles or folds. This will give you a clear view of the fabric and make it easier to measure and cut.
- Prepare your scissors – Make sure your fabric scissors are sharp and ready to go. Dull scissors can make the cutting process more challenging and result in jagged edges.
- Ensure your sewing machine or needle and thread are in good condition – If you’re using a sewing machine, check that it’s properly threaded and the needle is suitable for the fabric. If you’re hand stitching, ensure you have ample thread and a needle that can handle the task.
- Have your elastic band ready – Measure the elastic band to fit your waist comfortably and cut it to the desired length. If you prefer a looser fit, add a couple of inches to the measurement.
- Keep your sewing pins and measuring tape handy – These tools will be essential for securing fabric layers and measuring lengths accurately throughout the process.
- If you choose to embellish your skirt, gather your decorative trims or embellishments – You can explore adding lace, beads, ribbons, or any other creative elements to give your skirt a unique touch.
Take a moment to ensure all your supplies are easily accessible. This will save you time and frustration as you progress through the transformation process.
Step 2: Prepare the Tank Top
Now that you have everything you need, it’s time to prepare the tank top for the transformation. Follow these steps:
- Turn the tank top inside out – This will allow you to work on the seams and markings without affecting the appearance of the final skirt.
- Smooth out any wrinkles – Ensure the fabric is flat and free of any folds or creases. This will make it easier to measure and cut accurately.
- Identify the desired length of the skirt – Put on the tank top and use a measuring tape to determine the length at which you want your skirt to fall. Mark this length on the tank top using fabric chalk or pins. Remember to account for the waistband and hem when determining the length.
- Adjust the tank top if needed – If you want to modify the shape or fit of the skirt, now is the time to do so. You can taper the sides for a more fitted look or create a flared silhouette by widening the bottom.
Preparing the tank top is an essential step that sets the foundation for the skirt. Take your time to ensure the tank top is in the desired shape and length before moving on to the next steps.
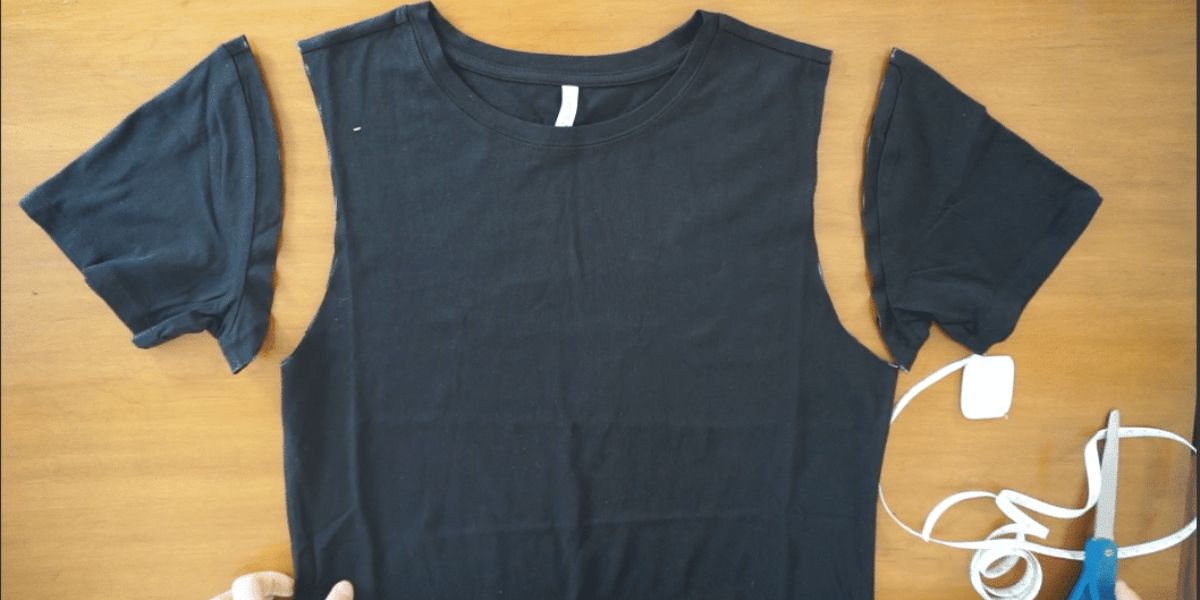
Step 3: Cut the Tank Top
With the tank top prepared, it’s time to transform it into a skirt by cutting it. Follow these steps:
- Align the bottom edge of the tank top – Make sure the bottom edge is even all the way around. Smooth out any wrinkles or folds.
- Using fabric scissors, carefully cut along the marked line or pins that indicate the desired length of your skirt. Take your time and make precise cuts to ensure a clean and even hemline.
- Set aside the top portion of the tank top that you just cut off – You can repurpose this fabric for other projects or save it for future use.
When cutting the tank top, it’s important to be cautious and precise. Take it slow to avoid any mistakes, uneven cuts, or accidental snipping of fabric. Double-check your measurements and alignment before making the cuts.
Once you’ve cut the tank top, you’ll have a fabric tube that will serve as the base for your skirt.
Step 4: Create a Waistband
Now that you have the fabric tube, it’s time to create a waistband for your skirt. Follow these steps:
- Measure and cut the elastic band – Wrap the elastic band around your waist to determine the desired length. Subtract an inch or two from this measurement to ensure a snug fit. Cut the elastic to this length.
- Pin the ends of the elastic band to the top edge of the fabric tube – Create small folds in the fabric tube and place the ends of the elastic band inside these folds. Use sewing pins to secure the ends of the elastic band to the fabric tube.
- Distribute the fabric evenly along the elastic band – Gather the fabric tube evenly around the elastic band, distributing it to create pleats or ruffles. Pin the fabric in place to hold it in position.
- Secure the fabric to the elastic band – Using a sewing machine or needle and thread, stitch the fabric to the elastic band. You can use a straight stitch or a zigzag stitch for added stretch and durability. Sew carefully to ensure that the elastic band remains flat and is not twisted.
- Try on the skirt – Once the fabric is securely attached to the elastic band, try on the skirt to ensure a comfortable fit. Make any adjustments as needed by pinning the fabric tighter or loosening it.
Creating the waistband is an important step in turning your tank top into a skirt. Take your time to ensure that the elastic band is securely attached and the fabric is evenly distributed to create a flattering and comfortable fit.
Step 5: Finish the Skirt Hem
With the waistband in place, it’s time to finish the hem of your skirt. Follow these steps:
- Try on the skirt again – Put on the skirt to assess the desired length. You may want to make additional adjustments to the hem based on your personal preference.
- Measure and mark the desired length – Use a measuring tape to determine the length from the bottom edge of the skirt. Mark this length with fabric chalk or pins. Ensure the marking is consistent all around the skirt.
- Even out the hem – Carefully trim any uneven edges or excess fabric to ensure a clean and straight hemline. Take your time and make small, precise cuts as needed.
- Sew the hem – Fold the fabric at the marked line, creating a small fold. Pin the fabric in place along the entire hemline. Using a sewing machine or needle and thread, stitch along the folded edge, securing the hem in place. Choose a stitch that is suitable for your fabric and provides a neat finish.
- Remove the pins – Once the hem is securely stitched, remove the pins from the fabric. Give the skirt a final check to ensure the hem is even and well-sewn.
Finishing the hem adds a polished look to your skirt. Be mindful of the length and make adjustments as necessary to achieve the desired style and fit.
Step 6: Try on and Adjust as Needed
Once you have finished the hem, it’s time to try on your newly transformed skirt and make any necessary adjustments. Follow these steps:
- Put on the skirt – Slip into your skirt and fasten the waistband around your waist. Take note of the fit and how it sits on your body.
- Check the length – Assess the length of the skirt and make sure it falls at the desired point on your legs. If it’s too long, you can trim the hem further. If it’s too short, you can add a decorative trim or lace to extend the length.
- Adjust the waistband – If the waistband feels too loose or tight, you can make adjustments by removing or adding stitches to the elastic band. Ensure that the waistband provides a comfortable and secure fit.
- Assess the overall look – Take a moment to evaluate the silhouette and style of your skirt. Ensure it flatters your body shape and complements your personal style.
- Make additional modifications – If you have any other ideas to enhance the skirt, such as adding pockets or embellishments, now is the time to do so. Get creative and experiment with different elements to make it truly unique.
Trying on the skirt allows you to see how the final product looks and feels on your body. Making necessary adjustments ensures that the skirt fits properly and meets your expectations. Don’t be afraid to make modifications or add personal touches to make it your own.
Conclusion
Congratulations! You have successfully transformed a plain tank top into a stylish and trendy skirt. Through a few simple steps, you turned an unused or old garment into a fashionable piece that you can proudly wear.
By upcycling and repurposing your clothing, not only do you save money, but you also contribute to sustainable fashion practices. Transforming your tank top into a skirt allows you to exercise your creativity while reducing waste and promoting a more eco-friendly wardrobe.
Remember, this DIY project can be customized to suit your personal style. Feel free to experiment with different fabrics, colors, and embellishments to make your skirt truly unique. Add lace trim, embroidery, or even pockets to add extra flair and functionality.
Once you have mastered this tank top to skirt transformation, you can apply the same techniques to other garments and explore endless possibilities for revamping your wardrobe.
Now, it’s time to step out in your newly created skirt and embrace your one-of-a-kind style! Share your DIY journey with others and inspire them to unleash their creativity through clothing transformations.
Happy crafting!